Yes, you should prime kitchen cabinets before painting. Priming ensures better paint adhesion and durability.
Painting kitchen cabinets is a significant home improvement task. Priming is essential for a professional finish. It helps seal the surface, blocks stains, and provides a smooth base for paint. Skipping primer can result in chipping and uneven color. Primer also helps in covering dark or stained wood, allowing the paint to show true color.
Use a quality primer suitable for your cabinet material. This step saves time and effort in the long run. Proper preparation, including sanding and cleaning, is crucial. Priming may seem like an extra step, but it enhances the final result significantly. Make sure to choose the right primer for your specific needs.
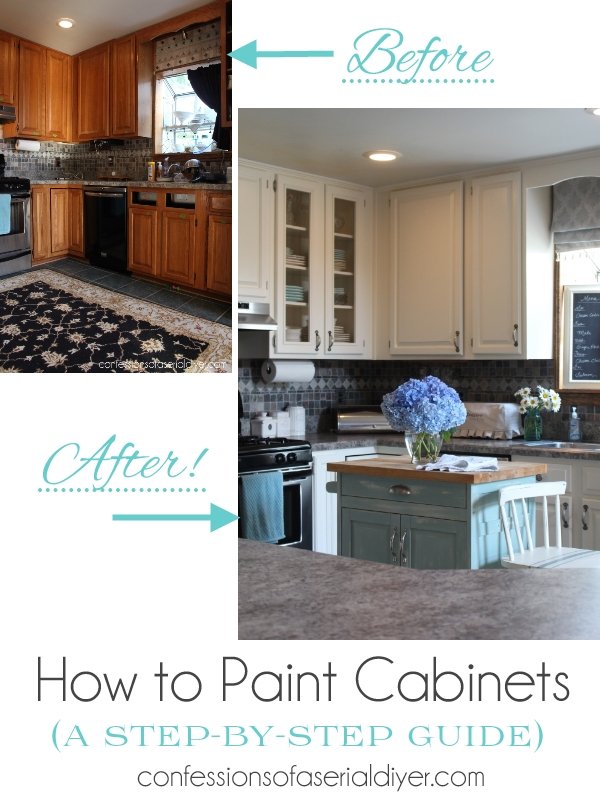
Credit: designertrapped.com
Importance Of Priming
Priming kitchen cabinets is a crucial step before painting. It provides a smooth surface for the paint to adhere to. This ensures a longer-lasting finish. Priming also seals the wood, preventing stains and tannin bleed-through. This enhances the final appearance of your cabinets.
Improved Paint Adhesion
Priming improves the adhesion of paint to the cabinet surfaces. Without primer, paint may peel or chip off easily. Primer creates a sticky base that grabs onto the paint. This results in a more uniform and professional look.
Consider the following benefits of improved paint adhesion:
- Prevents peeling and chipping
- Ensures a smooth, even finish
- Reduces the number of paint coats needed
Enhanced Durability
Priming your cabinets enhances their durability. It adds an extra layer of protection to the wood. This makes the cabinets more resistant to wear and tear. Primer also helps to fill in minor imperfections. This results in a smoother surface that lasts longer.
Here are some key points on enhanced durability:
- Protects wood from moisture
- Reduces the risk of stains and discoloration
- Extends the life of your paint job
| Benefits | Explanation |
|---|---|
| Improved Paint Adhesion | Prevents peeling, ensures smooth finish, fewer coats needed |
| Enhanced Durability | Protects wood, reduces stains, extends paint life |
Types Of Primers
Choosing the right primer for your kitchen cabinets is crucial. It affects the final look and durability of your paint job. Different primers offer different benefits. Let’s explore the types of primers you can use for your kitchen cabinets.
Oil-based Primers
Oil-based primers are popular for kitchen cabinets. They offer excellent adhesion and stain-blocking properties. This type of primer is ideal for cabinets with existing stains or dark colors. Oil-based primers dry to a hard finish. This makes them perfect for high-traffic areas.
Here are some advantages of oil-based primers:
- Seals porous surfaces
- Blocks stains effectively
- Provides a smooth finish
Despite their benefits, oil-based primers have some drawbacks:
- Long drying time
- Strong odor
- Requires solvent-based cleanup
Water-based Primers
Water-based primers are another great option. They are easier to use and clean up. These primers are low in VOCs, making them environmentally friendly. Water-based primers dry quickly. They are perfect if you need to finish your project fast.
Here are some advantages of water-based primers:
- Quick drying time
- Low odor
- Easy to clean with soap and water
Water-based primers also have some limitations:
- Less effective at blocking heavy stains
- May require multiple coats
| Feature | Oil-Based Primer | Water-Based Primer |
|---|---|---|
| Drying Time | Long | Short |
| Odor | Strong | Low |
| Cleanup | Solvent-based | Soap and water |
| Stain Blocking | High | Moderate |
When To Skip Priming
Priming kitchen cabinets is often essential for a flawless finish. But some situations allow you to skip this step. Knowing when to skip priming can save you time and effort. Below are key scenarios where priming may not be necessary.
Pre-primed Cabinets
Pre-primed cabinets are ready for paint application. These cabinets already have a primer coat. This saves you the hassle of applying a separate primer layer.
Pre-primed cabinets come from the factory with a smooth primer finish. This finish helps the paint adhere better. You only need to clean the surface before painting.
Here’s a quick checklist for pre-primed cabinets:
- Ensure the primer coat is even and smooth.
- Clean the surface with a mild detergent.
- Lightly sand any rough spots.
- Apply your chosen paint color.
Using Paint And Primer In One
Paint and primer in one products simplify the painting process. These products combine both primer and paint into one formula. This can eliminate the need for a separate primer coat.
These combo products are excellent for minor touch-ups. They also work well on surfaces with minimal wear. Choose a high-quality brand for the best results.
Benefits of using paint and primer in one:
- Reduces the number of coats needed.
- Saves time and effort.
- Provides good coverage.
- Works well on already painted surfaces.
Consider a few factors before using these products. Make sure the surface is in good condition. Also, ensure the paint is compatible with your cabinet material.
| Scenario | When to Skip Priming |
|---|---|
| Pre-Primed Cabinets | Already have a primer coat. |
| Paint and Primer in One | Combined formula for minor touch-ups. |

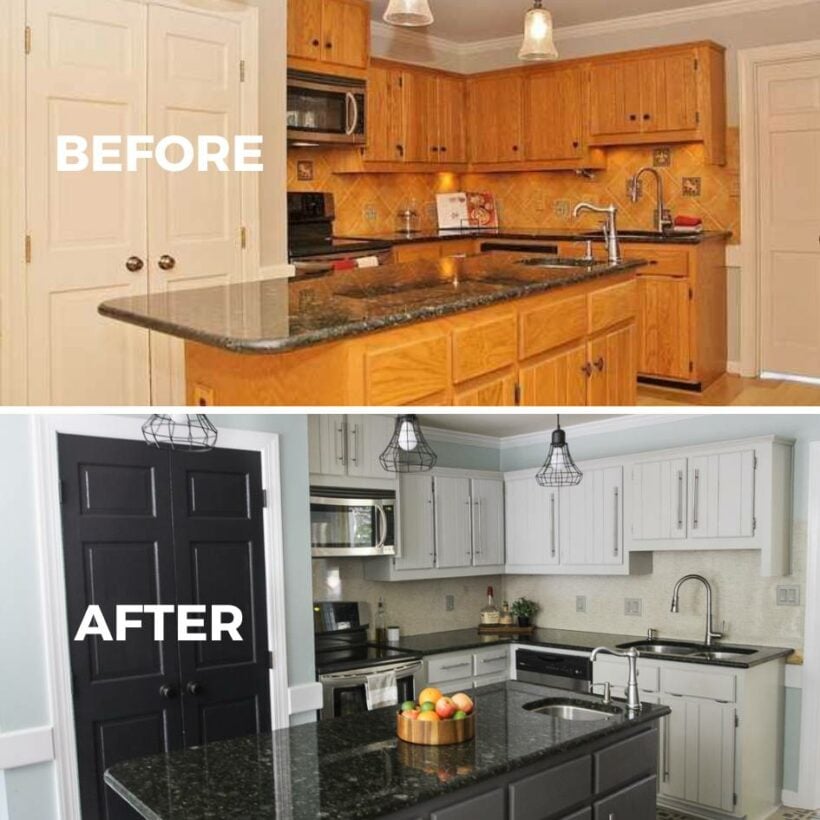
Credit: withlovemercedes.com
Surface Preparation
Preparing the surface is crucial for painting kitchen cabinets. Proper preparation ensures the paint adheres well. It also provides a smooth finish. Below are the essential steps for surface preparation.
Cleaning Cabinets
Before painting, clean your cabinets thoroughly. Grease, grime, and dust can ruin the paint job. Use a mild detergent and warm water for cleaning. Scrub all surfaces, including corners and edges. Rinse with clean water and dry with a soft cloth. This step removes all contaminants.
Sanding Techniques
Sanding is the next step after cleaning. Sanding helps the primer and paint stick better. Use 120-grit sandpaper for the first pass. Sand all surfaces evenly. Pay attention to flat areas and detailed edges. After the initial sanding, use a finer 220-grit sandpaper. This smoothens the surface further. Wipe away the dust with a tack cloth before priming.
Here is a simple table to summarize the sanding process:
| Sanding Step | Grit Size | Purpose |
|---|---|---|
| Initial Sanding | 120-grit | Remove old finish, roughen surface |
| Final Sanding | 220-grit | Smoothen the surface |
Follow these steps to ensure a perfect paint job. Clean and sand your cabinets for the best results.
Primer Application Tips
Priming your kitchen cabinets is a crucial step before painting. It ensures the paint adheres well and lasts longer. Using the right techniques can make a big difference. Below are some essential tips to help you apply primer effectively.
Choosing The Right Tools
Using the right tools is essential for a smooth primer application. Here are some recommended tools:
- Brushes: Use high-quality brushes for detailed areas.
- Rollers: Select a foam roller for even coverage on flat surfaces.
- Sandpaper: Fine-grit sandpaper helps to smoothen the surface before priming.
These tools help achieve a professional finish. Make sure they are clean and in good condition.
Applying Even Coats
Applying even coats of primer is crucial for a smooth finish. Follow these steps:
- Start with a thin coat to cover the surface lightly.
- Let the first coat dry completely before applying the next one.
- Apply a second coat if necessary for better coverage.
- Sand lightly between coats to ensure smoothness.
These steps ensure even application and better adhesion of the paint.
Common Mistakes
Priming kitchen cabinets before painting is crucial for a smooth finish. Many people make common mistakes that affect the final result. Avoid these errors to achieve a professional look.
Over-priming
Over-priming is a frequent mistake. Applying too much primer can cause issues. Here’s why:
- Excessive Build-Up: Too much primer creates a thick layer. This leads to uneven surfaces.
- Longer Drying Time: More primer means longer drying times. This delays your project.
- Wasted Materials: Over-priming wastes primer. This increases costs unnecessarily.
One coat of primer is usually enough. Ensure it covers the surface evenly.
Skipping Sanding
Skipping sanding is another common mistake. Sanding prepares the surface for primer. Here are the consequences of not sanding:
- Poor Adhesion: Primer won’t stick well to a glossy surface.
- Visible Imperfections: Sanding smooths out dents and scratches. Skipping this step leaves flaws visible.
- Uneven Finish: Without sanding, the paint won’t look uniform. The texture will be inconsistent.
Always sand your cabinets before priming. Use fine-grit sandpaper for best results.
Expert Recommendations
Painting kitchen cabinets can transform your space. Experts suggest priming them first. This ensures a smooth and durable finish. Below are some expert recommendations on priming kitchen cabinets.
Top Primer Brands
Choosing the right primer is crucial. Here are some top primer brands recommended by experts:
- Zinsser Bulls Eye 1-2-3: Excellent adhesion and stain blocking.
- Kilz Premium: Great for high-humidity areas and sealing porous surfaces.
- Benjamin Moore Fresh Start: Offers a smooth finish and excellent coverage.
- Rust-Oleum Zinsser Cover Stain: Ideal for blocking tough stains and tannin bleed.
Professional Insights
Professionals agree that priming is essential. Here are some insights:
- Adhesion: Primer helps paint stick better to surfaces.
- Durability: Priming extends the life of the paint job.
- Stain Blocking: Primer prevents stains from bleeding through the paint.
- Smooth Finish: It provides a uniform surface for the paint.
Experts also recommend cleaning cabinets before priming. Remove grease and grime using a degreaser. Sand the surfaces lightly to ensure better adhesion.
| Step | Action |
|---|---|
| 1 | Clean cabinets with a degreaser. |
| 2 | Lightly sand the surfaces. |
| 3 | Apply the primer evenly. |
| 4 | Allow the primer to dry completely. |
Following these expert recommendations ensures a professional finish. Your kitchen cabinets will look stunning and last longer.
Final Thoughts
Painting kitchen cabinets can transform your kitchen. But should you prime before painting? Let’s delve into the final considerations.
Balancing Time And Quality
Priming kitchen cabinets takes time. Skipping this step might seem faster. But consider the quality. A primer provides a smooth base. It ensures the paint adheres well. This step can save time in the long run.
Think of it as an investment. More prep work means less touch-up later. Your cabinets will look fresh for longer. Here is a quick comparison:
| With Primer | Without Primer |
|---|---|
| Better paint adhesion | Paint might peel |
| Smoother finish | Uneven look |
| Longer-lasting results | Frequent touch-ups needed |
Long-term Benefits
Priming offers several long-term benefits. It’s not just about the immediate look. Priming seals the wood. It prevents stains from bleeding through.
Priming also enhances paint durability. Your cabinets can withstand daily wear and tear. This can save money on future repainting. Consider these benefits:
- Stain prevention
- Enhanced durability
- Cost savings over time
In the end, priming adds value. It ensures your kitchen remains beautiful and functional. Make the smart choice for your home.
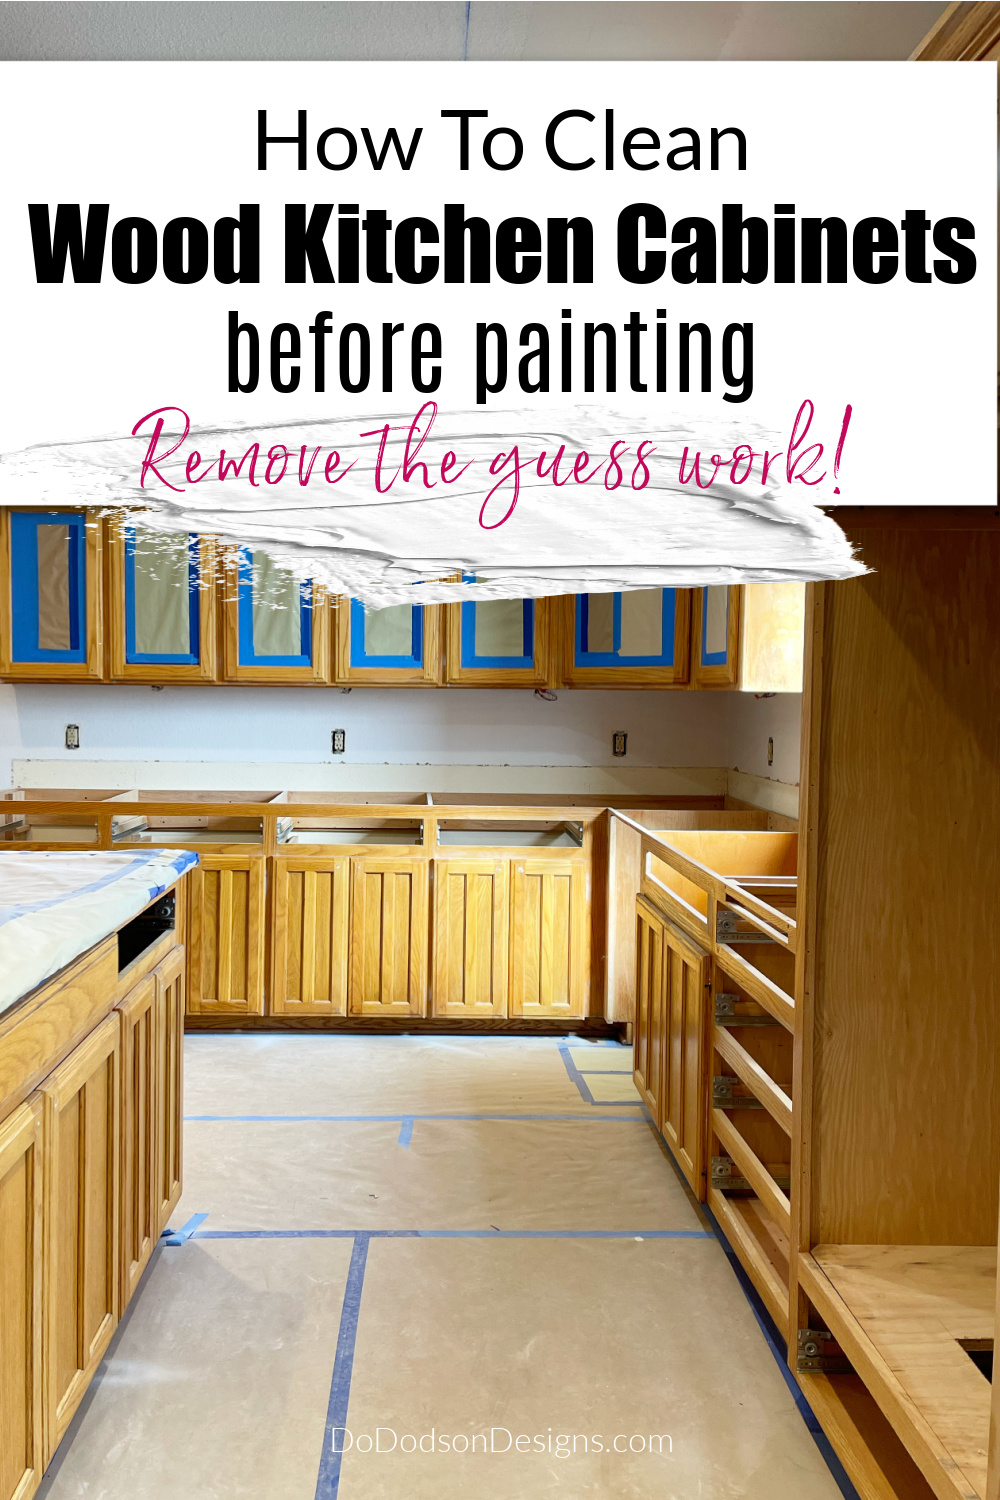
Credit: www.dododsondesigns.com
Frequently Asked Questions
Do You Need To Prime Kitchen Cabinets?
Yes, priming kitchen cabinets ensures better paint adhesion and a smoother finish.
What Primer Is Best For Kitchen Cabinets?
Choose a high-quality bonding primer designed for glossy or laminate surfaces.
Can You Paint Over Old Cabinets Without Priming?
No, priming is essential for proper paint adhesion and durability.
How Many Coats Of Primer On Cabinets?
Typically, one to two coats of primer are sufficient for kitchen cabinets.
Does Primer Help With Paint Durability?
Yes, primer improves paint durability by providing a solid base and preventing chipping.
Is Sanding Necessary Before Priming Cabinets?
Yes, sanding helps create a smooth surface and improves primer adhesion.
Can You Use Any Primer On Kitchen Cabinets?
No, use a primer specifically designed for cabinets and high-traffic areas.
How Long To Wait After Priming Cabinets?
Wait at least 24 hours for the primer to dry before painting.
What Happens If You Skip Priming Cabinets?
Skipping primer can lead to poor paint adhesion, peeling, and an uneven finish.
Is Oil-based Primer Better For Cabinets?
Oil-based primers are often preferred for their strong adhesion and durability on kitchen cabinets.
Conclusion
Priming kitchen cabinets before painting ensures a smooth, durable finish. It prevents stains and improves paint adhesion. This step may seem extra but can save time and money long-term. For the best results, always prime your cabinets before painting. Your kitchen will look professional and last longer.

