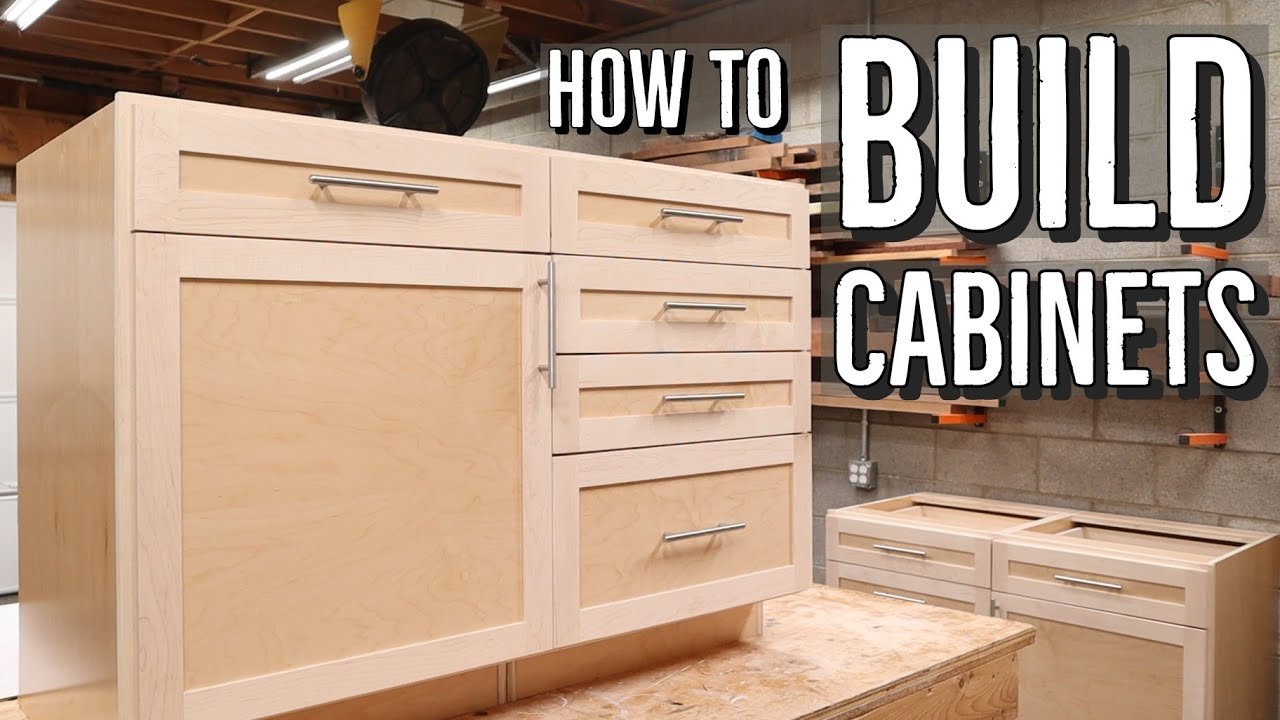
To build kitchen cabinets from scratch, measure and cut the wood, then assemble the frame and install doors. Sand and finish for a professional look.
Building kitchen cabinets from scratch is a rewarding project that enhances your woodworking skills. Start by gathering all necessary materials and tools, such as plywood, screws, and a saw. Accurate measurements are crucial for a seamless fit. Cut the wood to size, ensuring precision to avoid any assembly issues.
Assembling the frame is the next step, followed by attaching the doors and hardware. Sanding and finishing the cabinets provide a smooth and polished appearance. This step-by-step process ensures durable and custom kitchen cabinets that fit your space perfectly. Whether you’re a DIY enthusiast or a skilled woodworker, this guide helps you create beautiful, functional kitchen cabinets.
Planning Your Project
Before building kitchen cabinets from scratch, careful planning is crucial. This ensures your cabinets fit perfectly and are durable. Let’s dive into the essential steps for planning your project.
Choosing Materials
Selecting the right materials is the first step. You need wood that is sturdy and reliable. Plywood and MDF are popular choices. They are both strong and easy to work with. You also need finishing materials like paint or varnish. Check the quality of these materials before purchasing.
Gathering Tools
Having the right tools will make the job easier. Here is a list of essential tools you will need:
- Table saw
- Miter saw
- Drill
- Screwdriver
- Tape measure
- Clamps
- Sandpaper
- Level
Ensure all tools are in good working condition. This ensures safety and precision.
Measuring Your Space
Accurate measurements are crucial for a perfect fit. Here’s a step-by-step guide:
- Use a tape measure to measure the width, height, and depth of your space.
- Note down each measurement carefully.
- Measure again to double-check accuracy.
- Consider leaving a small gap for adjustments.
Use a level to ensure your measurements are straight. This helps in avoiding any alignment issues later on.
Credit: www.woodshopdiaries.com
Designing Your Cabinets
Designing your kitchen cabinets is the first step. It sets the foundation for your project. This section will guide you through sketching the layout, selecting cabinet styles, and finalizing dimensions.
Sketching The Layout
Start by sketching the layout of your kitchen. Use graph paper for accuracy. Draw the walls, windows, and doors. Mark the locations of appliances and fixtures. This helps in visualizing the space.
Next, decide where you want the cabinets. Think about functionality and aesthetics. Make sure to leave space for movement and accessibility. A well-thought-out layout ensures a smooth workflow in the kitchen.
Selecting Cabinet Styles
Choosing the right cabinet style is crucial. It defines the look and feel of your kitchen. Here are some popular styles:
- Shaker: Simple and clean lines.
- Flat-panel: Modern and sleek.
- Inset: Classic and elegant.
Consider your kitchen’s overall design. Match the cabinet style with your theme. Look at samples and photos for inspiration. Make sure the style you choose fits your needs and taste.
Finalizing Dimensions
Now, it’s time to finalize the dimensions of your cabinets. Measure the height, width, and depth. Write down these measurements. Ensure they match the space available.
Here’s a simple table to help you:
| Measurement | Standard Size | Custom Size |
|---|---|---|
| Height | 34-36 inches | As needed |
| Width | 12-48 inches | As needed |
| Depth | 12-24 inches | As needed |
Double-check each measurement. Precision is key. Incorrect dimensions can lead to problems during installation. Use a level and a tape measure for accuracy. You are now ready to move on to the next step.
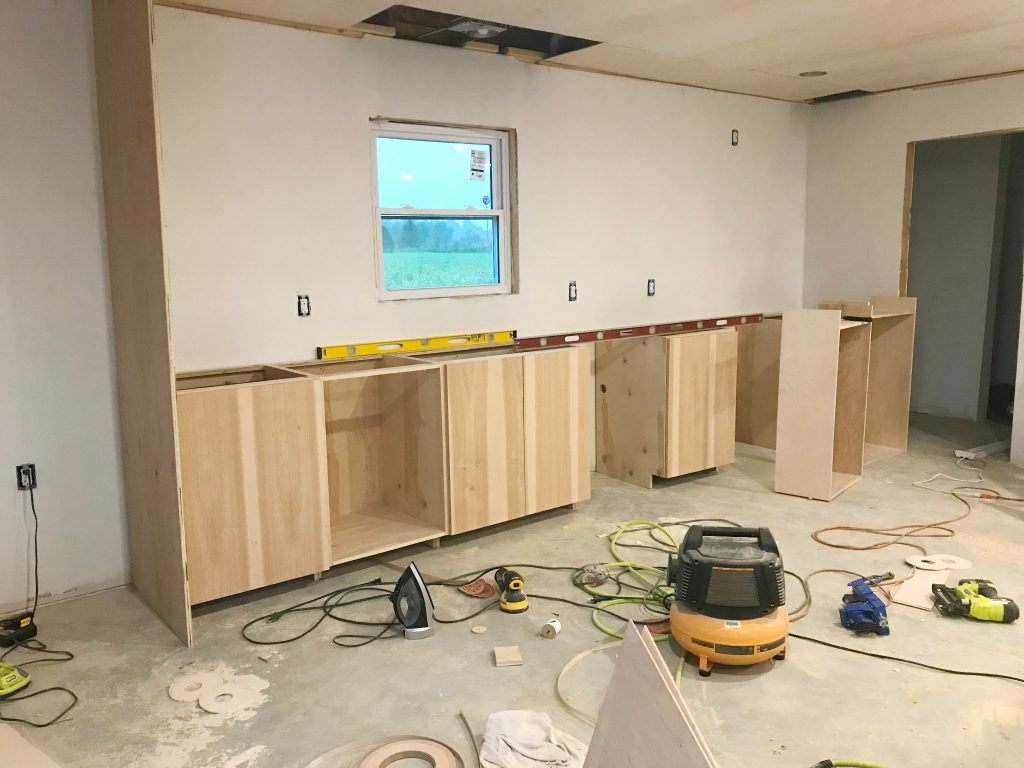
Preparing The Workspace
Preparing your workspace is the first step in building your kitchen cabinets. A well-organized area ensures safety and efficiency. It helps you stay focused and minimizes mistakes.
Clearing The Area
Start by clearing the area where you’ll work. Remove unnecessary items. Ensure you have enough space to move around freely.
- Move furniture out of the way.
- Remove any clutter.
- Clean the floor and surfaces.
Having a clean and organized space is crucial for a smooth workflow.
Setting Up Tools
Next, set up your tools. Arrange them so they’re easy to reach. This saves time and reduces frustration.
| Tool | Purpose |
|---|---|
| Hammer | For nailing pieces together |
| Drill | For making holes |
| Saw | For cutting wood |
| Measuring Tape | For accurate measurements |
Organize the tools on a workbench or a pegboard. This keeps them accessible and orderly.
Safety Precautions
Safety precautions are vital. Always wear protective gear. This includes safety goggles, gloves, and ear protection.
- Wear safety goggles to protect your eyes.
- Use gloves to prevent cuts and splinters.
- Wear ear protection if using loud tools.
Ensure your workspace is well-lit. Poor lighting can lead to mistakes and accidents.
By following these steps, you ensure a safe and efficient workspace. This makes the process of building your kitchen cabinets much smoother.
:max_bytes(150000):strip_icc()/CabinetOpener-2000-05483ad02f854fceb8833a3d91f687d3.jpg)
Credit: www.woodmagazine.com
Cutting The Wood
Cutting the wood is a crucial step in building your kitchen cabinets. Precise cuts ensure your cabinets fit together perfectly. This process involves marking measurements, using a saw, and sanding edges.
Marking Measurements
Start by measuring the dimensions of your cabinet pieces. Use a tape measure for accuracy. Mark these measurements on the wood using a pencil. Double-check your marks to avoid mistakes. Each piece should match your cabinet design plans.
Using A Saw
Choose the right saw for your cuts. A table saw is great for straight cuts. For intricate shapes, a jigsaw works best. Align the saw blade with your pencil marks. Cut slowly to maintain control. Ensure all pieces are cut to the exact size.
Sanding Edges
After cutting, sand the edges of each piece. Use medium-grit sandpaper for a smooth finish. This removes splinters and rough spots. Sanding helps the pieces fit together snugly. Clean the wood dust off once you are done.
Assembling The Frame
Building kitchen cabinets from scratch can be a rewarding project. Assembling the frame is one of the most critical steps. It ensures your cabinets are sturdy and durable. Follow these steps for a perfect frame assembly.
Joining Pieces
Begin by laying out all the pieces on a flat surface. Ensure you have all the required parts. The frame usually consists of side panels, top and bottom panels, and a back panel.
- Side Panels: These are the vertical pieces of the frame.
- Top and Bottom Panels: These are the horizontal pieces.
- Back Panel: This piece provides stability.
Align the side panels with the top and bottom panels. Use clamps to hold the pieces in place. Ensure everything is square before moving to the next step.
Using Wood Glue
Apply wood glue to the edges where the panels meet. Wood glue provides a strong bond and enhances the frame’s durability.
- Apply a thin, even layer of glue along the edges.
- Press the panels together firmly.
- Wipe off any excess glue with a damp cloth.
Allow the glue to set for a few minutes. This step ensures the panels stick together properly before securing them with screws.
Securing With Screws
Once the glue is set, secure the frame with screws. Screws provide additional strength and stability.
| Panel Type | Screw Size | Number of Screws |
|---|---|---|
| Side Panels | 1.5 inches | 4 per joint |
| Top and Bottom Panels | 1.5 inches | 4 per joint |
| Back Panel | 1.5 inches | 6 evenly spaced |
Pre-drill holes to prevent the wood from splitting. Drive the screws into the pre-drilled holes. Ensure they are flush with the wood surface.
Tip: Use a power drill for quick and easy screw installation.
With the frame assembled, you are ready to move on to the next step of your cabinet-building project.
Installing Shelves And Dividers
Installing shelves and dividers in your kitchen cabinets enhances organization. This section guides you through the process step-by-step. Follow these instructions to ensure your shelves and dividers are sturdy and well-fitted.
Measuring Inside Dimensions
First, measure the inside dimensions of your cabinet. Use a tape measure for accuracy. Measure the width, depth, and height of the space. Write these measurements down. Double-check to avoid mistakes. Accurate measurements ensure a perfect fit for your shelves and dividers.
Cutting Shelves
Next, cut your shelves to size. Use a table saw for clean cuts. Refer to your measurements. Mark the cutting lines on your wood. Ensure the lines are straight. Cut along the lines carefully. Sand the edges to smooth them out. This step prepares your shelves for installation.
Attaching Supports
Now, attach supports inside the cabinet. Use wooden cleats or metal brackets. Position the supports where you want your shelves. Make sure they are level. Mark the spots with a pencil. Drill pilot holes to prevent splitting. Screw the supports into place securely. The supports will hold your shelves steady.
| Step | Description |
|---|---|
| 1 | Measure inside dimensions of the cabinet. |
| 2 | Cut shelves to match measurements. |
| 3 | Attach supports inside the cabinet. |
Follow these steps to install shelves and dividers in your kitchen cabinets. Each step ensures a secure and customized fit. Happy building!
Adding Doors And Drawers
Adding doors and drawers to your kitchen cabinets brings functionality and style. This step requires careful attention to details. Make sure every part aligns perfectly. Follow these steps to ensure a smooth process.
Choosing Hinges
Start by selecting the right hinges for your cabinet doors. There are several types:
- Concealed hinges: Hidden when the door is closed.
- Overlay hinges: Wrap around the frame, partially visible.
- Inset hinges: Sit flush with the door and frame.
Pick hinges that match your cabinet design. Ensure they support the door’s weight.
Mounting Doors
To mount the doors, follow these simple steps:
- Mark the hinge positions on the door.
- Drill pilot holes for the screws.
- Attach the hinges to the door first.
- Align the door with the cabinet frame.
- Screw the hinges into the frame securely.
Ensure the doors open and close smoothly. Adjust the hinges if needed.
Installing Drawer Slides
Drawer slides come in various types. Choose the right one for your cabinets:
- Side-mount slides: Attach to the drawer sides and cabinet walls.
- Under-mount slides: Hidden under the drawer, offering a clean look.
- Center-mount slides: Single slide mounted at the drawer center.
Follow these steps to install drawer slides:
- Measure the drawer and cabinet opening.
- Mark the positions for the slides on both.
- Attach the slides to the drawer sides.
- Install the mating parts inside the cabinet.
- Slide the drawer into place and test its movement.
Make any necessary adjustments to ensure smooth operation.
By following these steps, you can add doors and drawers to your kitchen cabinets with ease. Proper alignment and choice of hardware are key to achieving a professional look.
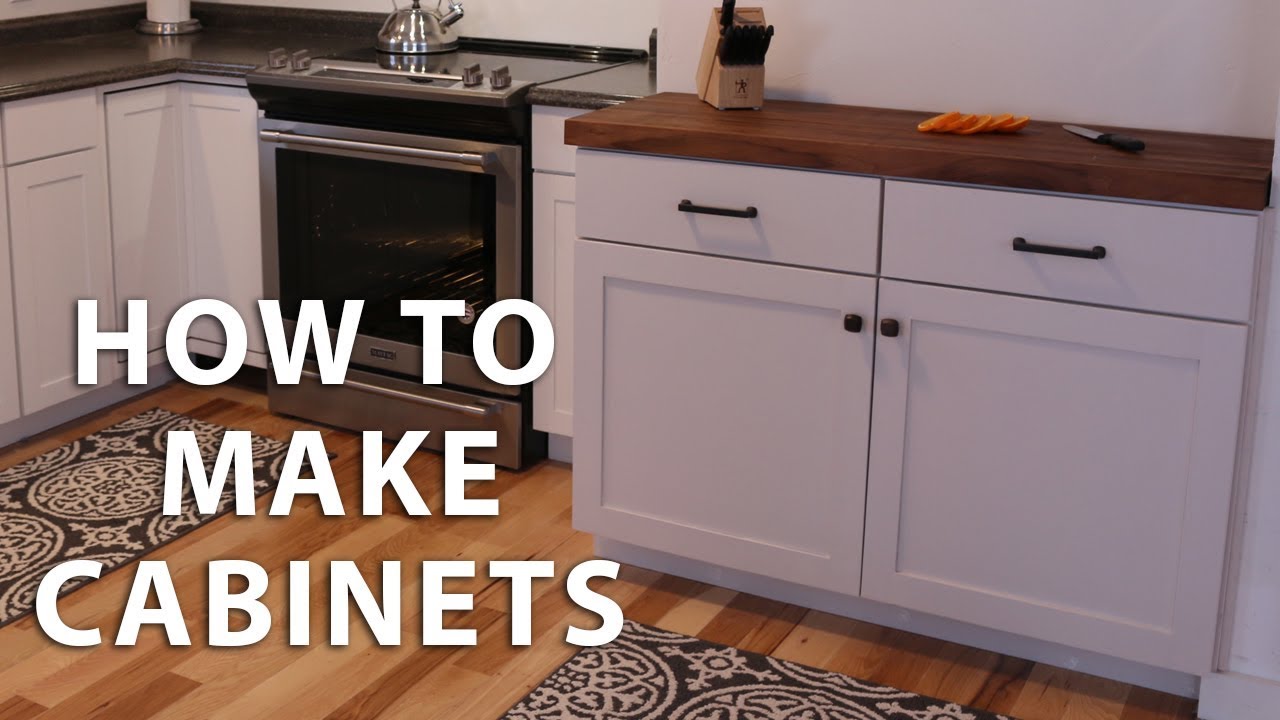
Credit: m.youtube.com
Finishing Touches
The final steps in building kitchen cabinets are very important. These steps make your cabinets look professional and complete. Let’s dive into the final touches to perfect your kitchen cabinets.
Sanding And Painting
Sanding is crucial for a smooth finish. Use fine-grit sandpaper to sand all surfaces. Sand in the direction of the wood grain. This makes the surface smooth and ready for painting.
Painting gives your cabinets a polished look. Use high-quality paint for best results. Apply a primer first. Then, add two coats of paint. Let each coat dry completely before adding the next.
Adding Hardware
Adding hardware is like adding jewelry to your cabinets. Choose handles and knobs that match your kitchen style. Measure carefully before drilling holes.
- Measure and mark the spots for hardware.
- Drill holes at the marked spots.
- Attach the knobs and handles using screws.
Inspecting And Adjusting
Inspection ensures your cabinets function properly. Check that all doors and drawers open and close smoothly.
- Open and close each door.
- Adjust hinges if doors do not align.
- Test drawers for smooth operation.
- Make small adjustments as needed.
Once everything is perfect, your kitchen cabinets are ready for use. Enjoy your beautiful new cabinets!
Frequently Asked Questions
What Materials Are Needed For Kitchen Cabinets?
You’ll need plywood, hardwood, screws, hinges, handles, and a finish like paint or varnish.
How Do You Measure For Kitchen Cabinets?
Measure the wall space accurately. Include height, width, and depth. Plan for doors and drawers.
What Tools Are Required To Build Cabinets?
You’ll need a saw, drill, clamps, sander, measuring tape, and a level.
How Do You Cut Cabinet Pieces Accurately?
Use a table saw and follow your measurements closely. Double-check before cutting.
What Is The Best Wood For Kitchen Cabinets?
Plywood and hardwood like oak or maple are great choices for durability and appearance.
How Do You Assemble Cabinet Frames?
Join the cut pieces using screws or nails, ensuring the frame is square and level.
How Do You Attach Cabinet Doors?
Use hinges to attach the doors to the frame. Align them carefully for smooth operation.
How Do You Finish Kitchen Cabinets?
Sand the surface, then apply paint, stain, or varnish evenly. Let it dry completely.
How Do You Install Kitchen Cabinets?
Secure cabinets to wall studs using screws. Ensure they’re level and properly aligned.
What Are Common Mistakes To Avoid?
Avoid inaccurate measurements, poor wood choices, and improper leveling during installation.
Conclusion
Building kitchen cabinets from scratch can be rewarding and cost-effective. Follow each step carefully for the best results. Don’t rush; precision matters. With patience and dedication, your custom cabinets will enhance your kitchen’s beauty and functionality. Enjoy the satisfaction of your handcrafted creation and the compliments from friends and family.

