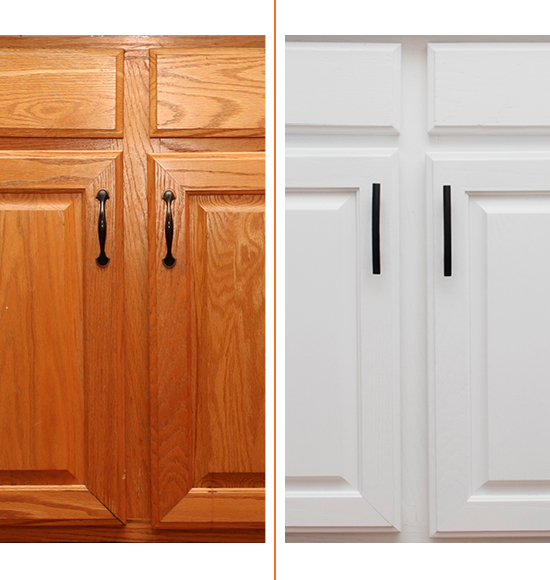
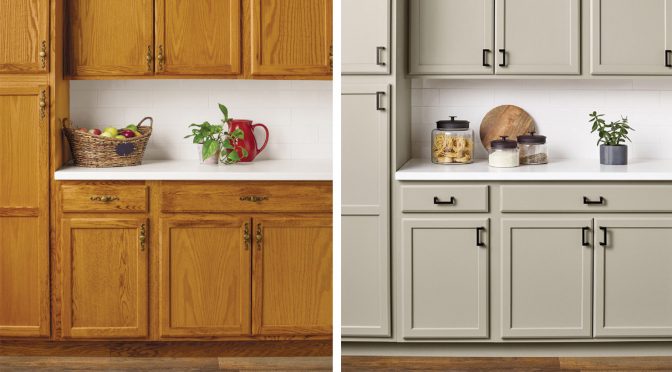
Professionals refinish kitchen cabinets by removing the old finish, sanding, applying primer, and then painting or staining. The process restores the cabinets’ appearance and durability.
Refinishing kitchen cabinets can transform the look of your kitchen without the high cost of replacement. Professionals follow a meticulous process to ensure a high-quality finish. They start by carefully removing the old finish to prepare the wood surface. Sanding smooths out any imperfections and creates a suitable texture for the new finish.
Applying a primer helps the paint or stain adhere better and last longer. Finally, they apply the chosen paint or stain in even coats, often finishing with a protective sealant. This method not only enhances the aesthetic appeal but also extends the life of your kitchen cabinets.
Preparation Steps
Refinishing kitchen cabinets requires careful preparation to ensure a smooth and durable finish. The preparation steps are crucial for achieving professional results. Below, we delve into the essential tasks involved in the preparation phase.
Gather Materials
Before starting, gather all necessary materials. This ensures a seamless workflow.
- Sandpaper (various grits)
- Painter’s tape
- Drop cloths
- Cleaning solution
- Safety goggles
- Respirator mask
- Paint brushes and rollers
- Primer and paint
- Screwdriver
Ensure all tools and materials are within reach. This saves time and effort.
Safety Precautions
Safety is paramount during refinishing. Follow these precautions to protect yourself.
- Wear safety goggles to protect your eyes from dust and chemicals.
- Use a respirator mask to avoid inhaling harmful fumes.
- Wear gloves to protect your hands from chemicals.
- Ensure good ventilation in the workspace.
- Keep a first aid kit nearby for emergencies.
Always prioritize safety to avoid accidents and health risks.
Removing Cabinet Doors
Refinishing kitchen cabinets can transform your kitchen’s appearance. The first step is removing cabinet doors. This process ensures each door is handled with care and reinstalled correctly.
Labeling Doors
Labeling doors is essential for proper reinstallation. Use a simple system:
- Number each door with a sticky note.
- Record the corresponding cabinet number in a notebook.
- Ensure labels are secure and won’t fall off.
Labeling keeps everything organized, saving you time later. Proper labeling prevents mix-ups and ensures a smooth reinstallation.
Unscrewing Hinges
Start by gathering the right tools:
- Screwdriver
- Power drill
- Container for screws
Follow these steps:
- Support the door with one hand.
- Use the screwdriver to remove screws from the hinges.
- Place screws in a labeled container.
- Carefully set the door aside.
Keeping screws organized helps with reassembly. Unscrewing hinges carefully avoids damage to the cabinet or door.
Cleaning And Sanding
Refinishing kitchen cabinets involves cleaning and sanding for a smooth finish. These steps are essential for a professional look. Clean cabinets ensure the paint adheres well. Sanding smoothens the surface for a flawless finish.
Degreasing Surfaces
Grease can ruin the finish of your cabinets. Professionals start by degreasing the surfaces. Here’s a simple method:
- Mix warm water with mild dish soap.
- Use a sponge to scrub the cabinet surfaces.
- Rinse with clean water and dry with a cloth.
Sometimes, stubborn grease requires stronger cleaners. Professionals use a degreaser like trisodium phosphate (TSP). They dilute TSP with water and scrub the surfaces thoroughly. This ensures no grease remains.
Sanding Techniques
Sanding is crucial for a smooth finish. It helps the paint stick better. Professionals use different sanding techniques:
| Type of Sandpaper | Grit | Purpose |
|---|---|---|
| Coarse | 60-80 | Remove old finish |
| Medium | 100-150 | Smooth surface |
| Fine | 180-220 | Prepare for painting |
Professionals follow these steps for sanding:
- Start with coarse grit to remove old finish.
- Switch to medium grit for a smoother surface.
- Finish with fine grit to prepare for painting.
They use a sanding block or an electric sander for even results. Corners and crevices may require hand sanding. After sanding, they wipe the surfaces with a damp cloth to remove dust. This ensures a clean surface for painting.
Repairing Damages
Repairing Damages is a crucial step in refinishing kitchen cabinets. It ensures a smooth and professional finish. Damages can range from minor cracks to outdated hardware. Professionals tackle each issue methodically.
filling Cracks
Cracks can appear over time due to wear and tear. Professionals use wood filler to address these cracks. Here’s a simple process they follow:
- Clean the crack area with a soft cloth.
- Apply wood filler using a putty knife.
- Let the filler dry completely.
- Sand the area smoothly with fine-grit sandpaper.
This method ensures a seamless look on your cabinets.
replacing Hardware
Outdated or damaged hardware can affect the cabinet’s appearance. Professionals replace old hardware to give cabinets a fresh look. Here are the steps they follow:
| Step | Action |
|---|---|
| 1 | Remove old handles and knobs carefully. |
| 2 | Fill old screw holes with wood filler. |
| 3 | Sand the filled holes smoothly. |
| 4 | Install new hardware using a screwdriver. |
New hardware enhances the overall aesthetic of your kitchen cabinets.
Priming Surfaces
Priming is a key step in refinishing kitchen cabinets. It ensures a smooth, durable finish. Professionals take great care in this process. Let’s explore how they prime surfaces effectively.
Choosing Primer
Choosing the right primer is essential. Oil-based primers work well for glossy surfaces. Water-based primers are better for non-glossy surfaces. Both types help the paint stick better. They also block stains and odors.
| Primer Type | Best For |
|---|---|
| Oil-based Primer | Glossy Surfaces |
| Water-based Primer | Non-glossy Surfaces |
Always read the labels on primer cans. This helps you choose the right one. Professionals often use high-quality primers. This ensures a long-lasting finish.
Applying Primer
Applying primer correctly is crucial. Follow these steps for best results:
- Clean the cabinets thoroughly. Remove grease and dirt.
- Sand the surfaces lightly. This helps the primer adhere better.
- Wipe away dust with a damp cloth.
- Apply primer using a brush or roller. Use even strokes.
- Let the primer dry completely. This usually takes a few hours.
- Inspect the surface. Apply a second coat if needed.
Professionals often use high-quality brushes. This ensures a smooth application. They also work in a well-ventilated area. This helps the primer dry faster.
Painting Techniques
Refinishing kitchen cabinets can breathe new life into your space. Using the right painting techniques is crucial for a professional look. Below, we explore the essential aspects of painting kitchen cabinets.
Selecting Paint
Choosing the right paint is the first step. Professionals often use high-quality, durable paints. These paints withstand daily wear and tear. Here are some options:
- Oil-Based Paints: Known for their durability and smooth finish.
- Latex Paints: Easier to clean and less odor.
- Acrylic Paints: Resistant to moisture and ideal for kitchen use.
Consider the finish as well. Semi-gloss and gloss finishes are popular. They are easy to clean and look sleek.
Brush Vs. Spray
Deciding between a brush and a spray gun is important. Both have their pros and cons.
| Method | Pros | Cons |
|---|---|---|
| Brush |
|
|
| Spray |
|
|
For intricate details, a brush works well. For a smooth, even finish, consider using a spray gun. Professionals often use a combination of both.
Reassembling Cabinets
After refinishing your kitchen cabinets, it’s time to reassemble them. This phase involves reattaching doors and aligning hinges. Proper reassembly ensures that your cabinets look fantastic and function well.
Reattaching Doors
Once the doors are refinished, carefully reattach them to the cabinet frames. Use the same screws you removed earlier. A screwdriver or drill will make this process easier.
- Position the door correctly on the cabinet frame.
- Insert screws into the pre-drilled holes.
- Tighten screws evenly to avoid misalignment.
Make sure all screws are tight. Loose screws can cause the doors to wobble or fall off.
Aligning Hinges
Aligning the hinges is crucial for a seamless look. Misaligned hinges can make doors hang crooked.
- Check the position of each hinge.
- Adjust the screws to align the door.
- Use a level to ensure the door is straight.
Small adjustments can make a big difference in alignment. Take your time to get it right.
Once the doors and hinges are aligned, your cabinets will look brand new.

Final Touches
After the main work is complete, it’s time for the final touches. These steps ensure your kitchen cabinets look perfect and function well. Professionals pay close attention to detail here, ensuring a flawless finish.
Installing Knobs
Installing knobs is a crucial step. They add both functionality and style.
First, professionals measure the placement. Accurate measurements ensure symmetry. They use a template for consistency. This template guides the exact spot for each knob.
Next, they drill holes. They use a drill bit that matches the screw size. Careful drilling prevents wood damage. After drilling, they attach the knobs. They use screws that come with the knobs. Tightening is done by hand to avoid over-tightening.
Finally, they inspect each knob. They ensure all knobs are straight and secure. Well-installed knobs enhance the cabinet’s look and usability.
Inspecting Finish
Inspecting the finish is the last step. This ensures a smooth and even look.
Professionals check for any imperfections. These include drips, bubbles, or rough spots. They use fine-grit sandpaper to fix minor issues. Sanding is done gently to avoid removing too much finish.
Next, they apply a final coat if needed. This coat adds extra protection and shine. They use a high-quality brush or sprayer for an even application. This ensures a flawless finish.
After the final coat dries, they do a last inspection. They check for any remaining flaws. If needed, they do touch-ups. This ensures the cabinets look perfect.
These final touches make a big difference. They ensure your refinished kitchen cabinets look professional and last long.
Maintenance Tips
Maintaining your newly refinished kitchen cabinets is essential for their longevity. Proper care can keep them looking new and fresh. Here are some easy and effective maintenance tips to follow.
Cleaning Routine
A regular cleaning routine helps in maintaining the beauty of your cabinets. Use a soft cloth and mild soap solution. Avoid abrasive cleaners and harsh chemicals. These can damage the finish. Wipe the cabinets with a damp cloth. Dry them immediately with a soft towel. This prevents moisture damage.
You can also create a cleaning schedule. Clean high-traffic areas weekly. Clean less-used areas monthly. This ensures all parts of your cabinets stay spotless.
Touch-up Advice
Small scratches and dents are unavoidable. Knowing some touch-up advice can save you from costly repairs. Keep a matching paint or stain handy. Use it to cover minor scratches. For deeper scratches, use a wax repair stick. Fill the scratch and buff it out.
For larger areas, sand the spot lightly. Apply a fresh coat of stain or paint. Let it dry completely. This keeps your cabinets looking uniform.
Frequently Asked Questions
What Is Cabinet Refinishing?
Cabinet refinishing involves sanding, painting, or staining existing cabinets to give them a new look.
How Do Professionals Refinish Cabinets?
Professionals clean, sand, prime, and paint or stain the cabinets for a durable, fresh finish.
How Long Does Refinishing Take?
Refinishing typically takes 3-5 days, depending on cabinet size and condition.
Is Cabinet Refinishing Cost-effective?
Yes, refinishing is usually cheaper than replacing cabinets, saving you money while refreshing your kitchen’s look.
Can I Refinish Cabinets Myself?
Yes, but professionals ensure a smoother, longer-lasting finish with specialized tools and techniques.
What Materials Are Needed For Refinishing?
Materials include sandpaper, primer, paint or stain, brushes, and a protective topcoat.
How Do I Choose A Refinishing Color?
Consider your kitchen’s overall design and color scheme. Neutral colors are versatile and popular choices.
Do I Need To Empty Cabinets Before Refinishing?
Yes, emptying cabinets ensures a thorough job and protects your items from dust and paint.
What Are The Benefits Of Refinishing?
Refinishing saves money, updates your kitchen’s look, and extends the life of your cabinets.
How Often Should Cabinets Be Refinished?
Typically, every 7-10 years, depending on wear and tear and your kitchen’s usage.
Conclusion
Refinishing kitchen cabinets can transform your space beautifully. Professionals use precise techniques for a stunning, durable finish. By understanding their process, you can make informed decisions for your kitchen. Hire experts for best results and enjoy a refreshed, vibrant kitchen space that adds value and charm to your home.

