
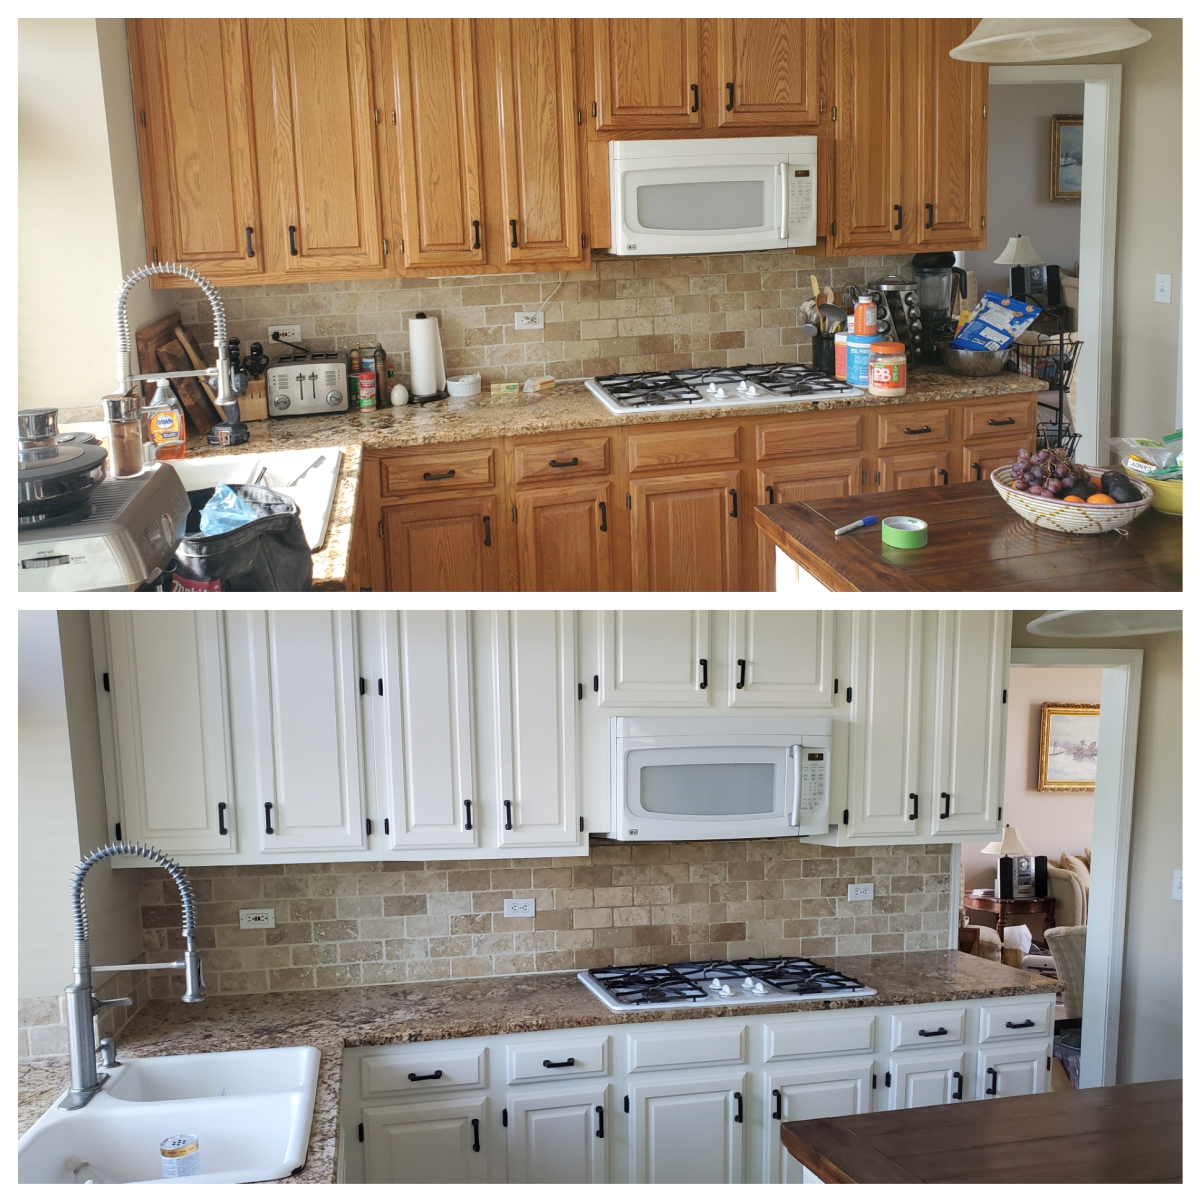
Yes, you can spray kitchen cabinets. Spraying provides a smooth, even finish that looks professional.
Spraying kitchen cabinets is a popular choice for homeowners seeking a high-quality, durable finish. This method offers a smooth, even coat of paint or stain, enhancing the overall appearance of your kitchen. It’s quicker and often more efficient than traditional brush painting.
Preparation is crucial; cabinets must be cleaned, sanded, and primed for the best results. Proper ventilation and protective measures are essential to ensure safety and prevent paint fumes from spreading. By investing in the right tools and taking the necessary precautions, you can achieve a professional-looking finish that revitalizes your kitchen space.

Choosing The Right Paint
Choosing the right paint for your kitchen cabinets is crucial. It can transform your kitchen’s look and feel. The paint you pick should be durable and easy to clean. Let’s explore the options.
Types Of Paint
There are several types of paint to consider. Each type has its own benefits and drawbacks. Here’s a quick guide:
| Type of Paint | Advantages | Disadvantages |
|---|---|---|
| Latex Paint | Easy to clean, dries quickly | Less durable than oil-based |
| Oil-Based Paint | Durable, smooth finish | Longer drying time, strong odor |
| Chalk Paint | Matte finish, no primer needed | Less durable, needs a top coat |
| Milk Paint | Eco-friendly, natural finish | Requires mixing, less durable |
Color Selection
Choosing the right color can be exciting. Think about your kitchen’s style and the mood you want. Here are some tips:
- Neutral Colors: White, beige, and gray are timeless. They make your kitchen look bigger.
- Bold Colors: Navy, forest green, or black can create a dramatic effect.
- Pastel Colors: Light blue, mint, or blush can add a soft touch.
Consider using a color wheel. It helps you find complementary colors. Balance bold and neutral colors for a cohesive look.
Preparing Your Cabinets
Before you spray kitchen cabinets, you must prepare them properly. This ensures a smooth and long-lasting finish. There are crucial steps to follow to achieve the best results. Let’s dive into the essential preparation steps.
Cleaning And Sanding
First, you need to clean your cabinets thoroughly. Use a degreaser to remove dirt, grease, and grime. A clean surface ensures the paint adheres well.
Next, sand the cabinet surfaces. Sanding helps to smooth out any imperfections. It also provides a better grip for the primer and paint. Use medium-grit sandpaper for the initial sanding. After that, use fine-grit sandpaper for a smooth finish.
After sanding, clean the dust off with a damp cloth. This step is crucial to avoid dust particles in your paint job.
Removing Hardware
Remove all cabinet doors and drawers. This makes painting easier and more thorough. Label each door and drawer to remember their original positions. Place the labels inside the holes or on painter’s tape.
Next, take off all handles, knobs, and hinges. Use a screwdriver for this task. Store the hardware in labeled bags to keep everything organized.
Consider replacing old hardware with new ones for a fresh look. If you plan to reuse the old hardware, clean them thoroughly. This ensures they look as good as the newly painted cabinets.
| Preparation Step | Details |
|---|---|
| Cleaning | Use a degreaser to remove dirt and grease. |
| Sanding | First, use medium-grit sandpaper, then fine-grit. |
| Removing Doors and Drawers | Label and take off all doors and drawers. |
| Removing Hardware | Take off handles, knobs, and hinges. |
Safety Precautions
Spraying kitchen cabinets can refresh your kitchen’s look. But, safety is key. Following safety precautions is essential to avoid health hazards and ensure a successful project. Below are essential safety tips to keep in mind.
Ventilation Tips
Proper ventilation is crucial when spraying cabinets. Paint fumes can be harmful if inhaled. Ensure windows and doors are open to allow fresh air to circulate. Use fans to direct fumes out of the room. This helps to minimize inhalation risks.
- Open all windows and doors.
- Use exhaust fans to remove fumes.
- Avoid spraying in enclosed spaces.
Protective Gear
Wearing protective gear can shield you from harmful chemicals. Always wear a mask to avoid inhaling fumes. Safety goggles protect your eyes from paint splashes. Gloves keep your hands safe from direct contact with paint.
| Protective Gear | Purpose |
|---|---|
| Mask | Prevents inhalation of fumes |
| Safety Goggles | Protects eyes from splashes |
| Gloves | Protects hands from chemicals |
| Coveralls | Keeps clothes and skin paint-free |
Following these safety precautions ensures your cabinet spraying project is both safe and successful. Always prioritize your health and safety.
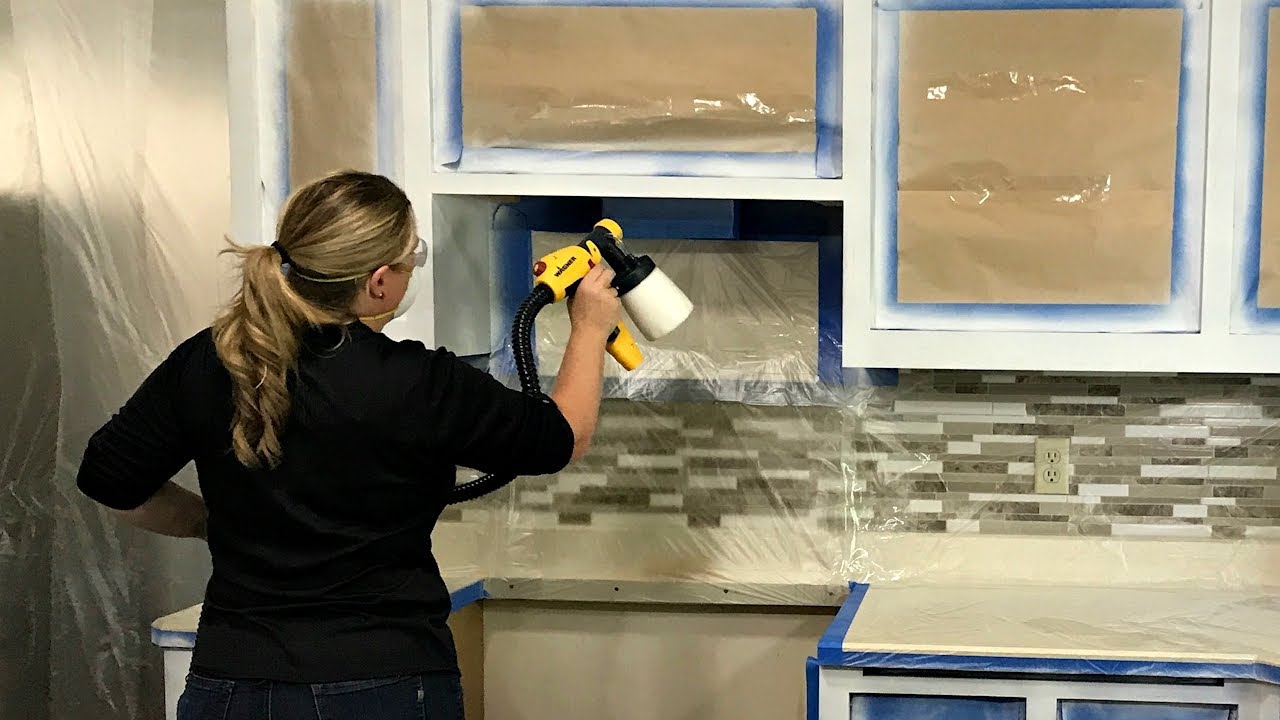
Tools And Equipment
Spraying kitchen cabinets can create a smooth and even finish. To achieve this, having the right tools and equipment is essential. Below, we cover the critical tools needed for this task.
Spray Guns
A quality spray gun is the most important tool. There are several types to consider:
- HVLP (High Volume Low Pressure) Spray Guns: These are ideal for detailed work.
- Airless Spray Guns: Perfect for larger surfaces and faster coverage.
- Compressed Air Spray Guns: Offers precise control but requires a compressor.
Choose a spray gun that suits your project size and detail needs. Ensure the spray gun is clean and well-maintained.
Other Essentials
Beyond the spray gun, several other tools are necessary:
| Tool | Purpose |
|---|---|
| Drop Cloths | Protect floors and surfaces from overspray. |
| Painter’s Tape | Mask off areas you don’t want painted. |
| Sandpaper | Smooth surfaces before spraying. |
| Primer | Prepares the surface for paint. |
| Respirator Mask | Protects you from inhaling fumes. |
Having these tools and equipment ensures a professional finish. Proper preparation and the right gear make the job easier and more efficient.
Step-by-step Spraying Guide
Spraying kitchen cabinets can give them a fresh look. Follow this step-by-step guide for the best results. This guide covers everything you need to know about priming and applying paint.
Priming
Priming your cabinets is crucial. It helps the paint stick better and last longer.
- Clean the cabinets: Use soap and water. Remove all grease and dirt.
- Sand the surfaces: Use fine-grit sandpaper. Sand until smooth.
- Apply primer: Use a spray primer. Apply in thin, even coats.
- Let it dry: Allow the primer to dry completely. This usually takes a few hours.
Applying Paint
After priming, it’s time to paint your cabinets. Follow these simple steps.
- Choose the right paint: Use high-quality paint made for cabinets.
- Test the spray gun: Make sure it sprays evenly. Practice on a piece of cardboard.
- Start spraying: Hold the spray gun 12 inches away. Apply thin, even coats.
- Let it dry: Allow each coat to dry. This usually takes a few hours.
- Apply a second coat: Repeat the process for a smooth finish.
Following these steps ensures a professional finish on your kitchen cabinets. Enjoy your new-look kitchen!
Drying And Curing
Spraying kitchen cabinets can give them a fresh, new look. One of the critical aspects of this process is the Drying and Curing period. Understanding this ensures a smooth and durable finish.
Drying Times
The drying time for sprayed cabinets depends on the type of paint used. Latex paint generally dries within 1-2 hours. Oil-based paint usually takes longer, around 6-8 hours. It’s essential to follow the manufacturer’s instructions for accurate drying times.
Humidity and temperature play vital roles in the drying process. Higher humidity levels can extend drying times. Maintaining a well-ventilated area can help speed up the process.
| Type of Paint | Drying Time |
|---|---|
| Latex | 1-2 hours |
| Oil-based | 6-8 hours |
Curing Process
Curing is different from drying. Drying is the evaporation of solvents. Curing involves the paint hardening and bonding to the surface.
For latex paint, the curing process can take up to 30 days. Oil-based paint may take 7-10 days to cure fully. During this time, avoid heavy cleaning or handling of the cabinets.
To ensure proper curing, keep the kitchen environment stable. Avoid drastic temperature changes and maintain moderate humidity levels.
Following these steps ensures a long-lasting and beautiful finish for your kitchen cabinets.
Finishing Touches
Completing your kitchen cabinet spray project involves careful attention to the finishing touches. It’s these details that will ensure your cabinets look professional and polished. Let’s explore key steps to achieve a flawless finish.
Reattaching Hardware
Reattaching hardware is a crucial step in the process. Ensure all pieces are clean and in good condition before reattaching. Follow these steps for a smooth reattachment:
- Organize Hardware: Keep screws, knobs, and handles in separate labeled containers.
- Inspect Condition: Check for any damage or wear and replace if necessary.
- Align Properly: Ensure hinges and handles align correctly with their original positions.
- Tighten Securely: Use the right tools to tighten screws and ensure stability.
Touch-up Tips
After reattaching hardware, you may need to address minor imperfections. Here are some touch-up tips to help you:
- Use Matching Paint: Keep a small amount of the cabinet paint for touch-ups.
- Soft Brush: Use a fine, soft brush for precision.
- Light Sanding: Gently sand any rough spots before applying paint.
- Feather Technique: Feather the edges to blend touch-up paint seamlessly.
For best results, perform touch-ups in good lighting. This ensures you don’t miss any spots.
Maintenance Tips
Maintaining your newly sprayed kitchen cabinets is crucial for their longevity. Regular upkeep will keep them looking pristine and fresh. Below are some essential maintenance tips to help you care for your cabinets.
Cleaning Cabinets
Regular cleaning is vital to maintain the look of your cabinets. Use a soft, damp cloth to wipe down the surfaces. Avoid abrasive cleaners as they can damage the finish.
- Use mild soap and water for daily cleaning.
- Dry the cabinets immediately after wiping to prevent water damage.
- Avoid harsh chemicals and scrubbing pads.
Handling Chips And Scratches
Chips and scratches can happen over time. Address them promptly to maintain the appearance of your cabinets.
- Touch up minor scratches with matching paint or a touch-up marker.
- For larger chips, consider using wood filler before repainting.
- Regularly inspect your cabinets for any signs of wear and tear.
Proper maintenance ensures your kitchen cabinets remain in excellent condition. Follow these tips to keep them looking new.
Frequently Asked Questions
Can You Spray Paint Kitchen Cabinets?
Yes, you can spray paint kitchen cabinets for a smooth, professional finish.
What Type Of Paint To Use?
Use high-quality, durable paint specifically designed for cabinets and furniture.
Do You Need To Sand Cabinets First?
Yes, lightly sanding helps the paint adhere better to the surface.
How To Prepare Cabinets For Spraying?
Clean, sand, and prime the cabinets before spraying for best results.
What Is The Best Spray Paint Brand?
Brands like Rust-Oleum, Krylon, and Valspar are popular for cabinet painting.
How Many Coats Of Spray Paint Needed?
Usually, 2-3 coats provide even and durable coverage.
Can You Spray Cabinets Without Removing Doors?
It’s possible, but removing doors ensures even coverage and fewer mistakes.
How Long Does Spray Paint Last?
With proper prep and application, spray-painted cabinets can last several years.
Is It Necessary To Use A Primer?
Yes, primer ensures better adhesion and a smoother finish.
How To Avoid Streaks When Spraying?
Use even, consistent strokes and maintain a steady distance from the surface.
Conclusion
Spraying kitchen cabinets can transform your space efficiently. It’s cost-effective and provides a smooth, professional finish. Ensure proper preparation and ventilation for best results. Whether DIY or hiring a pro, this method revitalizes your kitchen beautifully. Embrace the spray painting approach for a stunning cabinet makeover.

