Yes, you can repair kitchen cabinets. Basic repairs include fixing hinges, handles, and surface scratches.
Kitchen cabinets often endure significant wear and tear. Over time, their appearance and functionality can decline. Repairing them can be a cost-effective solution compared to replacing them entirely. Simple fixes like tightening loose hinges, replacing worn handles, or addressing surface scratches can rejuvenate their look.
More extensive repairs might involve refacing or repainting, which can transform the kitchen’s aesthetic. Homeowners with basic DIY skills can handle minor repairs, while professionals can address more complex issues. Maintaining and repairing kitchen cabinets can extend their lifespan, keeping your kitchen looking fresh and functional.
Assessing Cabinet Damage
Kitchen cabinets play a vital role in your home’s functionality and aesthetics. Over time, they may suffer from wear and tear. Assessing the damage helps you decide whether to repair or replace them.
Types Of Damage
Understanding the types of damage your cabinets can incur is essential.
- Scratches and Dents: These are surface-level damages that are usually cosmetic. They can often be fixed with a little sanding and painting.
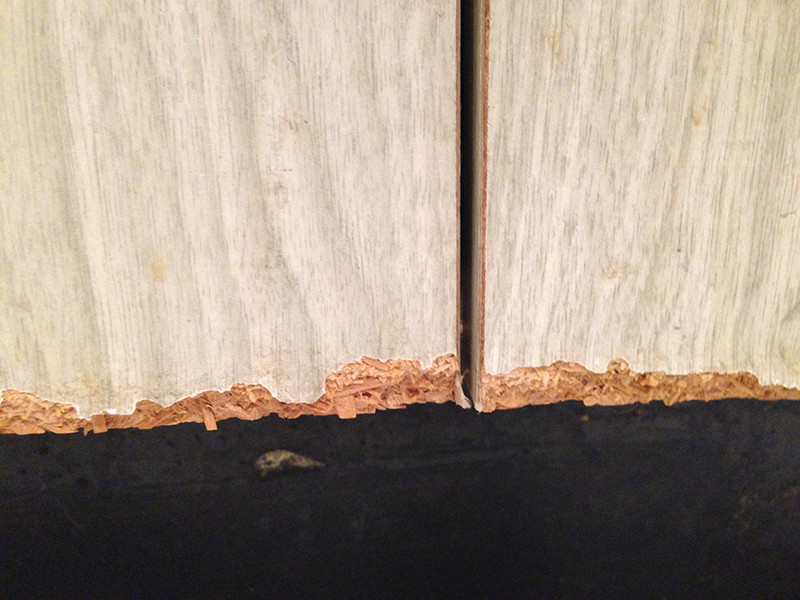
- Water Damage: Water can cause cabinets to warp, swell, or develop mold. This is a more severe issue that might require extensive repairs.
- Loose Hinges: Hinges can become loose over time, affecting the functionality of your cabinets. Tightening or replacing the hinges can solve this problem.
- Peeling Finish: A peeling finish affects the look of your cabinets. Re-finishing or re-painting can restore their appearance.
- Structural Damage: Cracks or breaks in the cabinet structure can compromise their stability. These issues may need more intensive repairs or even replacement.
When To Repair Or Replace
Knowing whether to repair or replace your cabinets depends on the extent of the damage.
| Damage Type | Repair | Replace |
|---|---|---|
| Scratches and Dents | ✔ | ✘ |
| Water Damage | ✔ (minor) | ✔ (severe) |
| Loose Hinges | ✔ | ✘ |
| Peeling Finish | ✔ | ✘ |
| Structural Damage | ✔ (minor) | ✔ (severe) |
If the damage is mostly cosmetic, repairing is often sufficient. For instance, scratches and dents can be sanded and repainted. Loose hinges can simply be tightened or replaced.
Severe water damage or structural issues may necessitate replacing the cabinets. Mold growth or warped wood often indicates that replacement is the best option. This ensures the safety and durability of your kitchen cabinets.
Essential Tools
Repairing kitchen cabinets can save money and refresh your kitchen. To do this, you’ll need the right tools. These tools fall into two main categories: basic tools and specialized equipment.
Basic Tools
- Screwdrivers: Both flat-head and Phillips-head types are essential. They help remove and install screws.
- Hammer: A claw hammer is useful for removing nails and hammering new ones.
- Measuring Tape: Precise measurements ensure a perfect fit for replacements.
- Level: This helps in aligning cabinet doors and shelves.
- Utility Knife: A sharp knife can trim materials like veneer or laminate.
Specialized Equipment
While basic tools handle many tasks, some repairs need specialized equipment. These tools make your work easier and more professional.
- Power Drill: A drill speeds up screw removal and installation. It also helps in creating precise holes.
- Jigsaw: This tool is perfect for cutting intricate shapes in wood or laminate.
- Clamps: Clamps hold pieces in place while glue dries or screws are tightened.
- Orbital Sander: This tool smooths surfaces quickly, readying them for paint or stain.
- Wood Filler: Wood filler repairs small holes or cracks in cabinet surfaces.
Having the right tools is crucial for a successful kitchen cabinet repair. Basic tools handle everyday tasks, while specialized equipment tackles specific challenges.
Preparation Steps
Repairing kitchen cabinets can save you money and refresh your kitchen. Proper preparation is crucial for achieving a professional finish. Follow these steps to ensure your cabinets are ready for repair.
Emptying Cabinets
Before starting any repair work, empty all cabinets. Remove dishes, food, and other items. This step protects your belongings from damage and gives you clear access to the cabinets. Use boxes or containers to organize and store your items temporarily.
Consider labeling the boxes to make it easier to put everything back. This can save you time and hassle later. A clean work area is essential for a smooth repair process.
Cleaning Surfaces
Once the cabinets are empty, it’s time to clean all surfaces. Dust, grease, and grime can interfere with your repairs. Use a mild detergent and warm water to clean thoroughly.
For stubborn stains, a mixture of baking soda and water can be effective. Apply the mixture, let it sit for a few minutes, then scrub gently with a sponge.
Make sure the surfaces are completely dry before proceeding with repairs. Use a dry cloth or paper towels to remove any remaining moisture. Clean surfaces ensure better adhesion for any repairs or paint you apply.
Fixing Hinges And Handles
Kitchen cabinets endure a lot of wear and tear. Hinges and handles often become loose or break. Fixing these parts is essential for maintaining functionality.
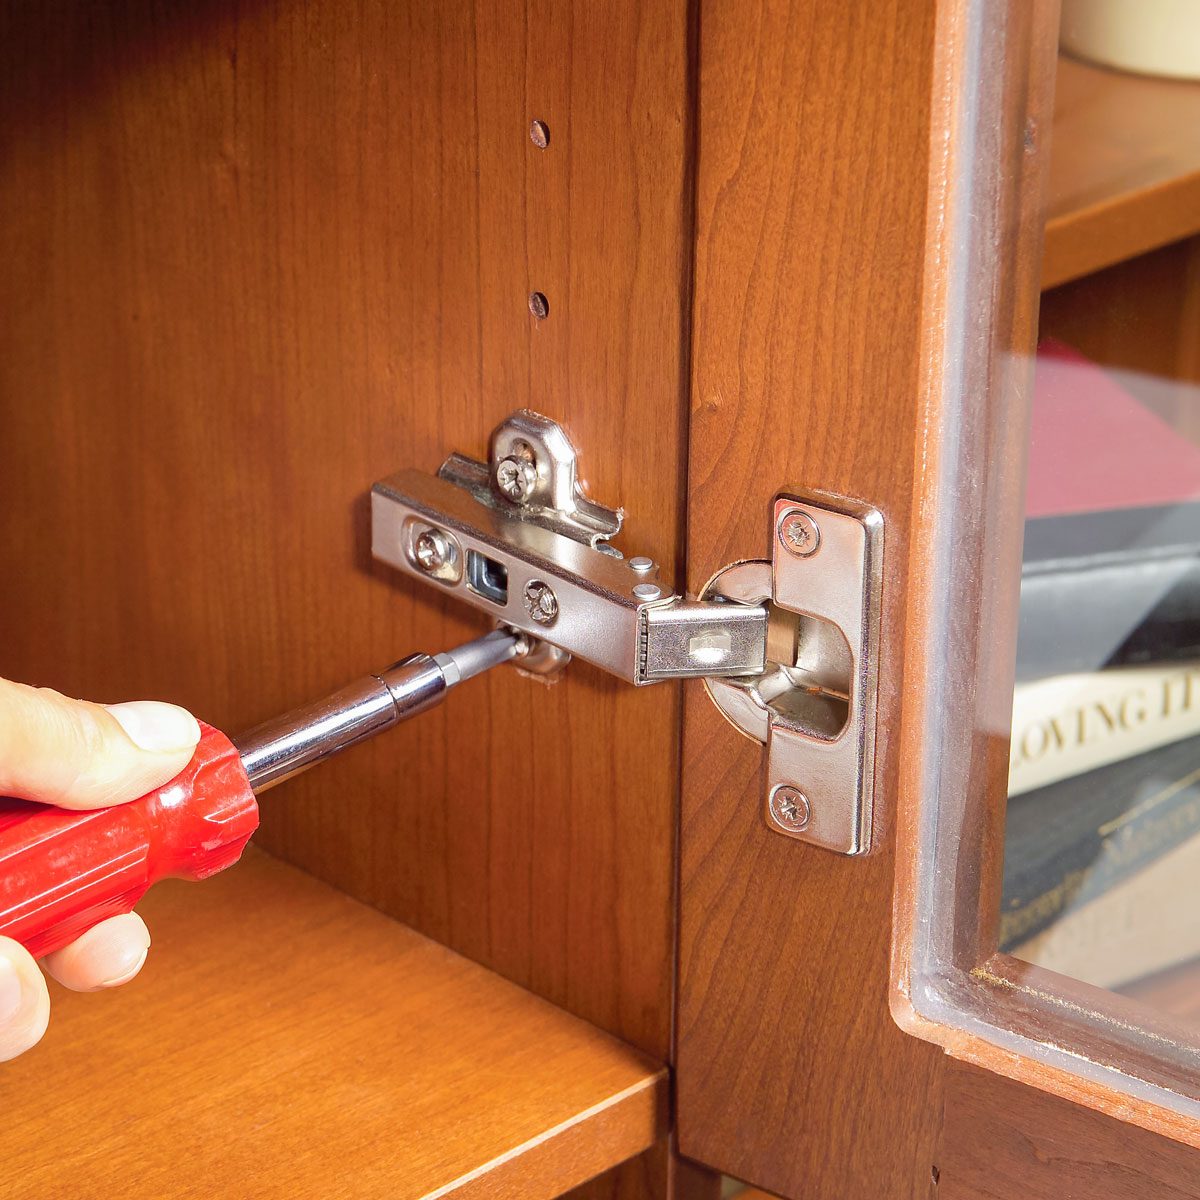
Tightening Loose Hinges
Loose hinges can make cabinet doors sag or misalign. Tightening them is a simple fix.
- Open the cabinet door fully.
- Locate the loose hinge screws.
- Use a screwdriver to tighten each screw.
- Check the door alignment and adjust if necessary.
If the screws don’t tighten, the holes may be stripped. Use toothpicks and wood glue to fill the holes. Insert the toothpicks, add glue, and let it dry. Then, reinsert the screws.
Replacing Handles
Replacing cabinet handles can give your kitchen a fresh look. It’s an easy task even for beginners.
- Remove the old handles using a screwdriver.
- Measure the distance between the screw holes.
- Buy new handles that match these measurements.
- Align the new handles with the holes.
- Screw in the new handles securely.
Use a level to ensure the handles are straight. This adds a professional touch.
| Task | Tools Needed |
|---|---|
| Tightening Hinges | Screwdriver, Toothpicks, Wood Glue |
| Replacing Handles | Screwdriver, Measuring Tape, Level |
Repairing Cabinet Doors
Kitchen cabinet doors can get damaged over time. Learning to repair them can save money. This guide will focus on patching holes and fixing warped doors.
Patching Holes
Small holes can make cabinets look old. Patching holes is simple and effective.
- Clean the area around the hole.
- Use wood filler to fill the hole.
- Let the filler dry completely.
- Sand the area smooth.
- Paint or stain to match the cabinet.
Tip: For large holes, use a patch piece of wood. Secure it with wood glue and nails. Then, follow the same steps as above.
Fixing Warped Doors
Warped doors can make cabinets look uneven. Fixing them is key for a neat kitchen.
- Identify the warp: Lay the door on a flat surface.
- Apply moisture: Use a damp cloth on the concave side.
- Clamp the door: Place heavy objects or clamps to flatten.
- Dry completely: Ensure the door is dry before reattaching.
Tip: Regularly check cabinet doors to catch warping early. This prevents more severe damage.
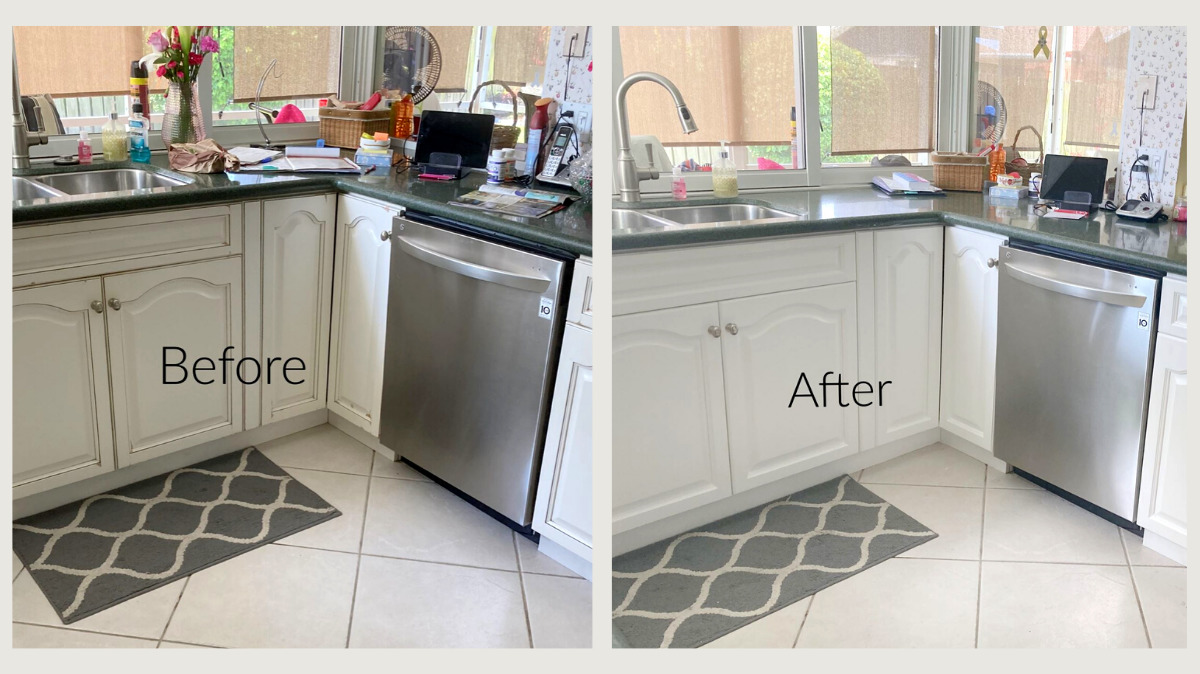
Refinishing Surfaces
Refinishing kitchen cabinets can breathe new life into your kitchen. It’s an affordable way to upgrade your home. With some time and effort, you can make old cabinets look new.
Sanding Techniques
Sanding is a crucial step in refinishing. It helps remove old finishes and smoothens the wood. Start with a coarse grit sandpaper, like 80-grit. This will help strip away the old finish.
Next, use a medium grit sandpaper, around 120-grit. This step smooths out any rough spots left by the coarse grit. Finally, use a fine grit sandpaper, like 220-grit. This ensures the surface is smooth and ready for the new finish.
Make sure to sand in the direction of the wood grain. This prevents scratches and achieves a smoother surface. Always wear a mask to protect yourself from dust.
Applying New Finish
Once the sanding is done, it’s time to apply the new finish. Choose a finish that matches your kitchen style. You can use paint, stain, or varnish.
Before applying the finish, clean the surface. Remove all dust using a tack cloth. This ensures the finish adheres properly.
For paint, apply a primer first. This helps the paint stick better and last longer. Use a brush or roller to apply the paint in thin, even coats. Let each coat dry completely before adding another.
If using stain, apply it with a cloth or brush. Wipe off excess stain with a clean cloth. Allow the stain to dry as per the product instructions.
Finally, for varnish, apply it with a high-quality brush. Use long, even strokes and avoid bubbles. Allow the varnish to dry and sand lightly with fine-grit sandpaper between coats.
These steps will help you achieve beautifully refinished kitchen cabinets. Your kitchen will look fresh and inviting.
Reassembling Cabinets
After repairing your kitchen cabinets, reassembling them is the next step. Proper reassembly ensures your cabinets function well and look great. This process involves aligning doors and securing hardware. Let’s dive into these steps.
Aligning Doors
Aligning cabinet doors is crucial for smooth operation. Misaligned doors can cause problems. Follow these steps for proper alignment:
- Check the hinge screws. Tighten any loose screws.
- Close the cabinet door. Observe the gap around the door.
- Adjust the hinges. Use a screwdriver to shift the door up, down, or sideways.
- Open and close the door. Ensure it moves smoothly without sticking.
Pro tip: Use a level to check door alignment. This ensures a perfect fit.
Securing Hardware
Securing hardware keeps your cabinets functional and stylish. Here’s how to secure them:
- Inspect handles and knobs. Ensure they are in good condition.
- Tighten screws. Use a screwdriver to secure them firmly.
- Replace damaged hardware. Buy new handles or knobs if needed.
Use a template for drilling holes. This keeps hardware placement consistent.
For more tips, check out the table below:
| Task | Tool | Tip |
|---|---|---|
| Aligning doors | Screwdriver | Use a level |
| Securing hardware | Drill | Use a template |

Maintenance Tips
Keeping your kitchen cabinets in top shape is essential for a beautiful kitchen. Simple maintenance can extend their lifespan and keep them looking new. Follow these maintenance tips to ensure your cabinets stay in excellent condition.
Regular Cleaning
Regular cleaning is crucial for maintaining your kitchen cabinets. Dust and grease can accumulate over time. Use a soft cloth and mild detergent to clean them.
Here’s a simple table to guide you:
| Task | Frequency |
|---|---|
| Dusting | Weekly |
| Wiping with mild detergent | Monthly |
| Deep cleaning | Quarterly |
Preventative Measures
Taking preventative measures can save your cabinets from damage. Avoid slamming doors and drawers. Use soft-close hinges if possible.
Consider these tips:
- Use coasters under wet items.
- Install liners inside cabinets.
- Keep away from direct sunlight.
- Fix leaks immediately.
Follow these simple steps to ensure your kitchen cabinets last longer.
Frequently Asked Questions
Can You Repair Kitchen Cabinets Yourself?
Yes, you can repair kitchen cabinets yourself with the right tools and materials.
What Tools Do I Need To Repair Cabinets?
Basic tools include screwdrivers, wood glue, clamps, sandpaper, and a drill.
How Do I Fix A Broken Cabinet Door?
Remove the door, apply wood glue, clamp it, and let it dry.
Can I Replace Cabinet Hinges Easily?
Yes, replacing cabinet hinges is a straightforward process with a screwdriver.
How Do I Repair Peeling Cabinet Veneer?
Use wood glue and a clamp to secure the peeling veneer back in place.
What Should I Do For Loose Cabinet Handles?
Tighten the screws or replace them if they are stripped.
How Do I Fix Sagging Cabinet Shelves?
Install additional brackets or replace the shelf with a stronger material.
Can I Repaint My Kitchen Cabinets?
Yes, cleaning, sanding, and applying a primer before painting gives the best results.
How Do I Remove Scratches From Cabinets?
Use a wood filler or a matching touch-up marker to conceal scratches.
Are Professional Cabinet Repairs Costly?
Costs vary, but DIY repairs can save you money.
Conclusion
Repairing kitchen cabinets is a feasible DIY project. With the right tools and patience, you can restore them. This saves money and refreshes your kitchen’s look. Always assess the damage first. Consider professional help if the damage is extensive. Happy repairing! Your kitchen will thank you.

