To fix peeling kitchen cabinets, first, remove the peeling material and sand the surface. Then, apply a suitable primer and paint.
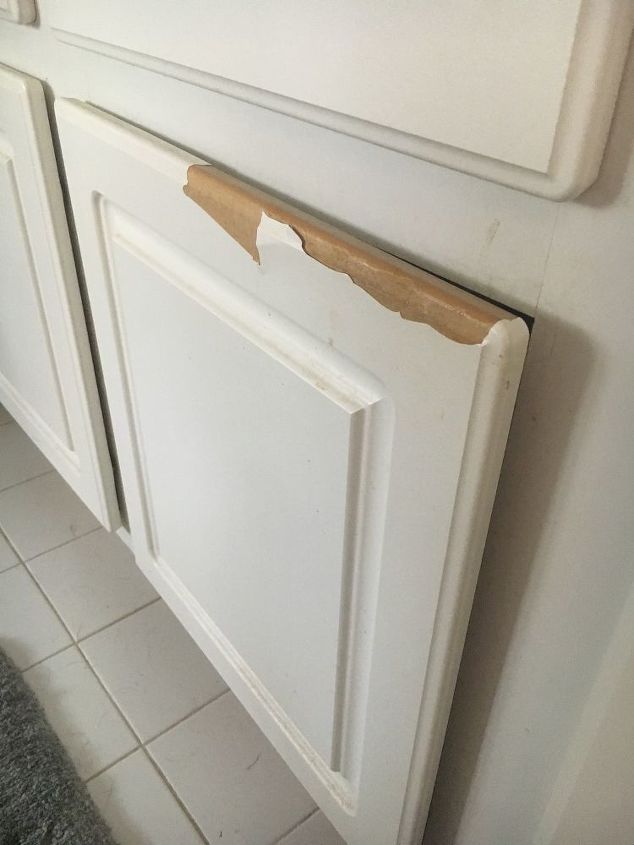
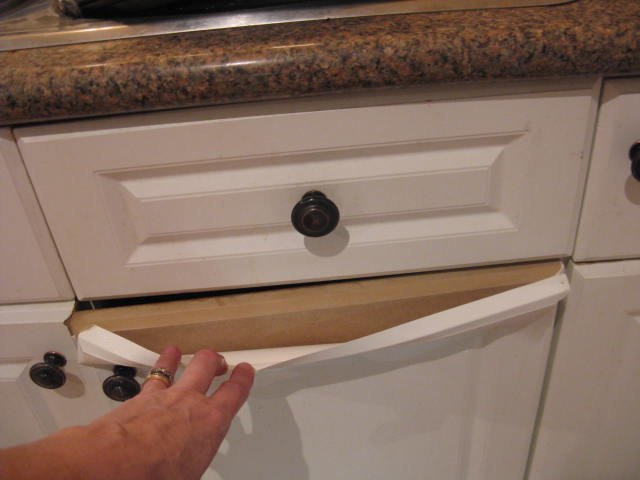
Peeling kitchen cabinets can make your kitchen look worn out and neglected. Addressing this issue promptly can restore the beauty and functionality of your cabinets. Start by examining the affected areas to understand the extent of the peeling. Removing the loose material is crucial to ensure a smooth finish.
Sanding the surface helps in creating a better base for the primer and paint to adhere. Choose high-quality primer and paint that are specifically designed for kitchen cabinets. This not only improves the appearance but also enhances durability. Proper maintenance and timely repairs can keep your kitchen looking fresh and inviting.
Identifying Peeling Cabinets
Kitchen cabinets can start to peel over time. This can spoil the look of your kitchen. Identifying the signs early can help you fix the issue quickly. Let’s explore the common signs and causes of peeling cabinets.
Common Signs
Peeling cabinets show several signs that are easy to spot. Look for these indicators:
- Bubbling paint or laminate: Small bubbles form under the surface.
- Cracked edges: The edges of the cabinet show cracks.
- Discoloration: The surface color changes or fades.
- Flaking: Pieces of the surface start to fall off.
Causes Of Peeling
Understanding the causes of peeling can help prevent it. Here are some common reasons:
| Cause | Description |
|---|---|
| Moisture | Water damage from spills or leaks can cause peeling. |
| Heat | High temperatures can weaken the adhesive on the cabinets. |
| Poor Installation | Improper installation can lead to peeling over time. |
| Low-quality materials | Cheap materials are more prone to peeling and damage. |
| Harsh cleaners | Strong cleaning agents can damage the cabinet surface. |
Gathering Materials
Before fixing peeling kitchen cabinets, you need the right materials. Proper preparation ensures a smooth and successful repair. Here’s a detailed guide on gathering materials for the task.
Essential Tools
Tools make your job easier and faster. Here’s a list of essential tools you’ll need:
- Screwdriver Set: For removing and reattaching cabinet doors.
- Putty Knife: To scrape off old peeling material.
- Sandpaper: Helps in smoothing the surface.
- Paintbrushes: For applying primer and paint.
- Clamps: To hold parts in place while they dry.
Recommended Supplies
Along with tools, you also need supplies. These ensure a durable and professional finish:
| Supply | Purpose |
|---|---|
| Wood Filler | Fills any gaps or holes in the wood. |
| Primer | Prepares the surface for painting. |
| Paint | Gives your cabinets a fresh look. |
| Wood Glue | Secures loose or peeling parts. |
| Protective Gloves | Keeps your hands safe and clean. |
Gathering the right materials is the first step to a successful repair. Make sure you have everything ready before starting the project. This ensures you won’t have to stop midway to find missing items.
Preparing The Area
Before fixing your peeling kitchen cabinets, you must prepare the area. This step ensures a smooth and efficient repair process. Proper preparation minimizes mess and protects your kitchen.
Clearing The Workspace
First, clear the workspace around your kitchen cabinets. Remove all items from the countertops and cabinets. This includes dishes, appliances, and decorations.
Next, remove any cabinet doors or drawers. Use a screwdriver to unscrew hinges and handles. Place screws and hardware in a small container for safekeeping. This will keep them organized and easy to find later.
Finally, make sure the area is free from dust and debris. Use a vacuum or a damp cloth to clean surfaces. A clean workspace helps with better adhesion during the repair process.
Protecting Surrounding Surfaces
It’s essential to protect surrounding surfaces from damage. Use painter’s tape to cover nearby walls and countertops. This will prevent paint or adhesive from sticking to them.
Lay down a drop cloth or old sheets on the floor. This will catch any drips or spills, making cleanup easier. You can also place cardboard or plastic sheets under the cabinets for extra protection.
Cover any adjacent appliances or furniture with plastic wrap or cloth. This will protect them from dust and chemicals used in the repair.
By following these steps, you ensure a clean and safe workspace. This makes the repair process smoother and more efficient.
Removing Old Finish
Removing the old finish is crucial to restore peeling kitchen cabinets. This step ensures a smooth, clean surface for new paint or stain. You can use various methods to strip off the old finish, including sanding and chemical strippers.
Sanding Techniques
Sanding is a straightforward method to remove an old finish. You will need sandpaper, a sanding block, or an electric sander. Below are the steps to follow:
- Start with a coarse-grit sandpaper (60-80 grit) to strip off the old finish.
- Move in the direction of the wood grain to avoid scratches.
- Switch to a medium-grit sandpaper (120-150 grit) to smooth the surface.
- Finish with a fine-grit sandpaper (220 grit) for a polished look.
Always wear a dust mask and goggles for safety. Ensure good ventilation in your workspace.
Using Chemical Strippers
Chemical strippers can effectively remove old finishes without much effort. Follow these steps for best results:
- Choose a gel-based or liquid chemical stripper.
- Apply a thick coat of stripper with a brush.
- Wait for the stripper to bubble up and dissolve the old finish.
- Use a scraper to remove the dissolved finish.
- Clean the surface with mineral spirits to remove any residue.
Always follow the manufacturer’s instructions. Wear gloves and work in a well-ventilated area.
Repairing Damaged Areas
Peeling kitchen cabinets can be an eyesore. Fixing damaged areas is crucial. This process involves several steps. You’ll start by addressing cracks and holes. Then, you’ll need to smooth the surfaces. Follow these steps to restore your cabinets to their former glory.
Filling Cracks And Holes
Start by examining the cabinet surfaces. Look for cracks and holes. These need to be filled before any other repairs. Use wood filler for this task. Apply the filler with a putty knife.
- Remove any loose material from the cracks.
- Apply wood filler generously.
- Smooth it out with the putty knife.
Let the filler dry completely. Drying times vary, so check the product label. Once dry, you can sand the area. This will make it smooth and ready for painting.
Smoothing Surfaces
After filling the cracks and holes, the next step is smoothing surfaces. Sanding is essential for a smooth finish. Use fine-grit sandpaper for this task.
Follow these steps for sanding:
- Start with 120-grit sandpaper.
- Sand the filled areas gently.
- Switch to 220-grit sandpaper for a finer finish.
Wipe the surfaces with a damp cloth after sanding. This removes any dust. Your cabinets are now ready for priming and painting.
| Step | Tools Needed |
|---|---|
| Filling Cracks and Holes | Wood filler, Putty knife |
| Smoothing Surfaces | Sandpaper (120-grit, 220-grit), Damp cloth |

Applying New Finish
Peeling kitchen cabinets can ruin the look of your kitchen. Applying a new finish can make your cabinets look brand new. This process involves choosing the right paint and following a step-by-step painting guide. Let’s dive into each part to get your cabinets looking fresh again.
Choosing The Right Paint
Choosing the right paint is crucial for a lasting finish. Use high-quality paint made for cabinets. Look for moisture-resistant and scrubbable paints. These types will withstand the daily wear and tear in a kitchen.
- Oil-based paint: Durable and smooth finish.
- Latex paint: Easier to clean up and less odor.
- Chalk paint: Gives a rustic look but needs a topcoat.
Always get a small sample and test it first. This ensures the color and finish meet your expectations.
Step-by-step Painting Guide
Follow these steps to paint your kitchen cabinets:
- Remove the doors and hardware: Use a screwdriver to take off doors and handles.
- Clean the surfaces: Use a degreaser to clean all surfaces.
- Sand the cabinets: Lightly sand to remove old finish and smooth the surface.
- Apply primer: Use a high-quality primer suitable for cabinets.
- Paint the cabinets: Use a brush or roller for a smooth finish. Apply in thin, even coats.
- Let it dry: Allow the paint to dry completely between coats.
- Reassemble the cabinets: Once dry, reattach the doors and hardware.
For best results, apply at least two coats of paint. Allow each coat to dry thoroughly before applying the next. This helps achieve a smooth and durable finish.
| Step | Action |
|---|---|
| 1 | Remove doors and hardware |
| 2 | Clean the surfaces |
| 3 | Sand the cabinets |
| 4 | Apply primer |
| 5 | Paint the cabinets |
| 6 | Let it dry |
| 7 | Reassemble the cabinets |
By following these steps, you can give your kitchen cabinets a fresh, new look.
Sealing And Protecting
Sealing and protecting your kitchen cabinets is essential to prevent peeling. A good sealant will protect the wood and prolong the life of your cabinets. This section will guide you through the types of sealants and how to apply them.
Types Of Sealants
There are several types of sealants you can use:
| Type | Description |
|---|---|
| Polyurethane | Offers a hard, durable finish. Ideal for high-traffic kitchens. |
| Varnish | Provides a glossy finish. Great for a polished look. |
| Shellac | Gives a natural, warm appearance. Not as durable as polyurethane. |
| Wax | Easy to apply. Requires frequent reapplication. |
Application Tips
Follow these tips for the best results:
- Clean the surface: Ensure the cabinets are free of dust and grease.
- Sand lightly: Use fine-grit sandpaper for a smooth surface.
- Apply in thin coats: Multiple thin coats are better than one thick coat.
- Let it dry: Allow each coat to dry before applying the next one.
- Use a brush or roller: Choose a high-quality brush or foam roller for an even finish.
These steps will help you achieve a professional look and extend the life of your kitchen cabinets.
Maintaining Your Cabinets
Maintaining your cabinets is essential for their longevity and appearance. Proper care ensures they remain in top condition and prevents peeling. This guide highlights simple steps to keep your kitchen cabinets looking new.
Regular Cleaning
Regular cleaning is vital to maintain your kitchen cabinets. Dirt and grease build-up can cause peeling. Follow these steps for effective cleaning:
- Wipe cabinets with a soft, damp cloth weekly.
- Use a mild detergent mixed with warm water.
- Avoid abrasive cleaners that can damage the surface.
- Dry the cabinets immediately with a clean towel.
Ensure you clean spills immediately to prevent stains and damage. Regular cleaning also helps in identifying issues early.
Preventive Measures
Prevention is better than repair. Implement these measures to avoid peeling:
- Control Humidity: High humidity can cause wood to swell and peel. Use a dehumidifier if necessary.
- Use Cabinet Liners: Liners protect the inside surfaces from spills and stains.
- Avoid Excessive Heat: Keep cabinets away from heat sources like ovens and stoves.
- Apply Sealant: A sealant can protect the surface from moisture and wear.
These preventive steps can significantly extend the life of your kitchen cabinets. Regular checks and maintenance can save you from costly repairs.

Frequently Asked Questions
What Causes Kitchen Cabinets To Peel?
Moisture and heat exposure often cause the cabinet finish to peel.
Can Peeling Cabinets Be Fixed?
Yes, peeling cabinets can be fixed with proper preparation and materials.
What Tools Are Needed To Fix Peeling Cabinets?
You’ll need sandpaper, paint, primer, a putty knife, and a brush.
How Do You Prep Cabinets For Repair?
Clean the surface thoroughly and sand lightly to remove loose material.
Do You Need To Remove Cabinet Doors?
Removing doors makes it easier to repair and paint evenly.
What Type Of Paint Is Best?
Use high-quality, durable paint specifically made for cabinets.
Should You Use Primer Before Painting?
Yes, primer helps the paint adhere better and last longer.
How Long Does The Repair Process Take?
Depending on drying times, it usually takes 2-3 days.
Can You Prevent Cabinets From Peeling?
Yes, by controlling moisture and heat in the kitchen.
What Is The Cost Of Fixing Peeling Cabinets?
Costs vary but generally range from $50 to $200.
Conclusion
Fixing peeling kitchen cabinets can be straightforward with the right approach. By following these steps, your cabinets will look new again. Regular maintenance can prevent future peeling. Don’t let peeling cabinets ruin your kitchen’s appearance. Take action today and enjoy a refreshed kitchen space.

