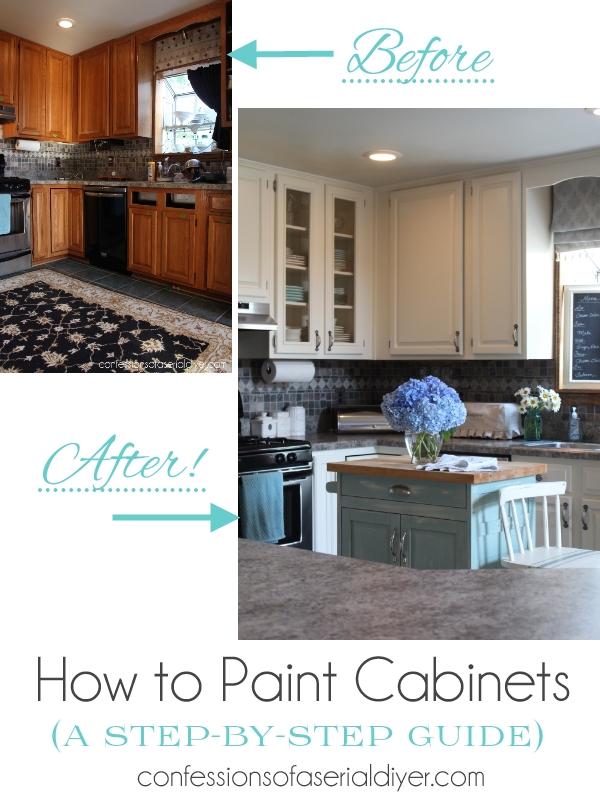
To paint kitchen cabinets, first remove the doors and hardware, then clean and sand the surfaces. Next, apply primer and paint for a fresh look.
Painting kitchen cabinets is a cost-effective way to rejuvenate your kitchen. It can completely transform the look and feel of the space. Proper preparation and technique are essential for a professional-looking finish. Start by removing all doors, drawers, and hardware.
This allows you to work on a flat surface and ensures even coverage. Cleaning the surfaces is crucial to remove grease and grime. Sanding helps the primer and paint adhere better. Using high-quality primer and paint designed for cabinets will result in a durable and beautiful finish. With patience and attention to detail, you can achieve stunning results.
Preparation
Before diving into painting, proper preparation ensures lasting and smooth results. Follow these steps to set the stage for a successful project. A well-prepared area makes the painting process easier and cleaner.
Gather Materials
Collect all necessary materials beforehand. It saves time and avoids disruptions. Here’s a list of essential items:
- Sandpaper or sanding blocks
- Painter’s tape
- Drop cloths or plastic sheeting
- Paint primer and paint
- Paintbrushes and rollers
- Screwdriver
- Cleaning supplies (soap, water, and a sponge)
Clear The Area
Remove all items from your kitchen cabinets. This includes dishes, food, and other objects. Clearing the area creates space to work and prevents accidents. Cover countertops and floors with drop cloths or plastic sheeting. It protects surfaces from paint splatters and dust.
Remove Hardware
Use a screwdriver to remove cabinet doors, hinges, and handles. Place screws and hardware in labeled bags. It helps in easy reassembly later. Label the doors with painter’s tape to remember their positions.
With these steps, your kitchen is ready for a fresh coat of paint. Preparation is key for a flawless finish. Stay organized and take your time. The results will be worth it.
Cleaning
Before you start painting, it’s essential to clean your kitchen cabinets. Proper cleaning ensures the paint adheres well. This prevents peeling and ensures a smooth finish. Clean cabinets also help in removing any grease and grime.
Degrease Surfaces
The first step is to degrease surfaces. Kitchen cabinets often have grease buildup. Use a degreaser solution or a mix of vinegar and water. Spray the solution on the cabinet surfaces. Scrub gently using a sponge or cloth. Pay attention to corners and edges. Grease can hide in these areas.
Rinse Thoroughly
After degreasing, it’s crucial to rinse thoroughly. Use a clean cloth dipped in warm water. Wipe down all cabinet surfaces. This removes any remaining degreaser. Rinse the cloth regularly to avoid spreading residue. Make sure no soap or cleaner is left behind. Let the cabinets dry completely before moving to the next step.
Sanding
Sanding is a crucial step in painting kitchen cabinets. It ensures the paint adheres well and the finish is smooth. Proper sanding can make a significant difference in the final look.
Choose Sandpaper
Choosing the right sandpaper is essential. The grit number determines the coarseness.
- 60-80 Grit: Use for heavy sanding and stripping.
- 100-150 Grit: Use for medium sanding and removing minor imperfections.
- 180-220 Grit: Use for fine sanding and smooth finishes.
For kitchen cabinets, start with 100-150 grit. Finish with 180-220 grit for a smooth surface.
Sand Cabinets
Before sanding, remove all hardware from the cabinets. Label and store them safely.
Follow these steps to sand your cabinets:
- Clean the cabinets: Use a degreaser to remove grease and dirt.
- Sand the surface: Use 100-150 grit sandpaper. Sand with the wood grain.
- Check for smoothness: Run your hand over the surface. It should feel smooth.
- Finish sanding: Use 180-220 grit sandpaper for a fine finish.
- Clean the dust: Use a vacuum and tack cloth to remove all dust.
Proper sanding ensures a smooth, professional finish. It prepares your cabinets for painting.
Priming
Priming is a crucial step in painting kitchen cabinets. It ensures a smooth and durable finish. Skipping this step can lead to poor results. Let’s dive into the details.
Select Primer
Choose the right primer for your cabinets. Different primers suit different surfaces.
- Oil-based primers work well on wood cabinets.
- Shellac-based primers block stains and odors.
- Water-based primers are low in odor and dry quickly.
Consult with a professional or check labels for best results. Quality matters for a long-lasting finish.
Apply Even Coat
Applying an even coat of primer is key to a smooth finish. Use a brush or roller.
- Start with the edges and corners using a brush.
- Use a roller for flat surfaces.
- Ensure the primer covers the entire surface.
Avoid drips and runs. Let the primer dry completely. Follow the manufacturer’s drying time instructions. Sand lightly for a smooth base before painting.
Painting
Painting your kitchen cabinets can breathe new life into your space. This step is where your cabinets start to transform. Follow these simple steps to ensure a smooth and beautiful finish.
Pick Paint
Choosing the right paint is crucial. Opt for high-quality paint designed for cabinetry. Satin or semi-gloss finishes work best for kitchen cabinets. They are durable and easy to clean. Also, ensure the paint is suitable for the material of your cabinets. Consult a paint expert if unsure.
First Coat
Start with a thin layer for the first coat. Use a high-quality brush or roller for a smooth application. Brush in the direction of the wood grain if working with wooden cabinets. Allow the first coat to dry completely. Drying times vary, so check the paint can for specific instructions.
Pro Tip: Use a foam roller for flat surfaces. It helps avoid brush marks.
Second Coat
Apply the second coat after the first one has dried. This coat ensures even coverage and a solid finish. Again, use smooth, even strokes and avoid overloading your brush. Let this coat dry thoroughly. Inspect for any missed spots or uneven areas.
Final Touch: After drying, lightly sand any imperfections. Wipe with a damp cloth before applying a clear topcoat for extra protection.
Drying
Drying is a crucial part of painting kitchen cabinets. Proper drying ensures a smooth and durable finish. Rushing this step can lead to imperfections. Follow these steps to ensure your cabinets dry perfectly.
Set Drying Time
Set an appropriate drying time for your painted cabinets. Different paints have different drying times. Check the paint can for recommended times. Usually, it takes about 24 hours for paint to dry. Humidity and temperature can affect drying times.
| Type of Paint | Recommended Drying Time |
|---|---|
| Latex Paint | 6-8 hours |
| Oil-Based Paint | 24 hours |
Ensure your kitchen is well-ventilated. Open windows and use fans. Proper ventilation speeds up the drying process.
Check For Tackiness
After the recommended time, check for tackiness. Lightly touch a hidden spot. If the paint feels sticky, it needs more time. If it feels dry and smooth, it’s ready for the next step.
- Touch a hidden area lightly.
- Check if the paint feels sticky.
- If sticky, wait a few more hours.
- If dry, proceed to the next step.
Repeat the tackiness check every few hours if needed. Do not rush this process. A perfectly dried cabinet ensures a professional finish.
Remember: Patience is key to achieving the best results.
Reassembly
Reassembling your kitchen cabinets is the final and exciting step. This process brings your hard work to life. Follow these simple steps to ensure a flawless finish.
Reattach Hardware
Gather all your hinges, knobs, and handles. Ensure they are clean and ready. Use a screwdriver to reattach the hinges to the cabinet doors.
- Align the hinge screws with the pre-drilled holes.
- Insert and tighten each screw securely.
- Double-check for any loose fittings.
Next, reattach the knobs and handles. Align them with the existing holes and secure them with screws. Ensure they are tight and even.
Reinstall Doors And Drawers
Begin by reinstalling the cabinet doors. Hold the door in place and line up the hinges with the cabinet frame.
- Insert the hinge screws into the pre-drilled holes.
- Tighten the screws securely.
- Ensure the door swings open smoothly.
Repeat this process for each door. Next, reinstall the drawers. Slide the drawer onto the tracks and push it in until you hear a click.
| Step | Action |
|---|---|
| 1 | Align drawer with tracks. |
| 2 | Push drawer until it clicks. |
| 3 | Check for smooth operation. |
Ensure all drawers open and close easily. This completes the reassembly process. Enjoy your newly painted kitchen cabinets!
Finishing Touches
The final step in painting kitchen cabinets is crucial. It ensures a professional look. These finishing touches make all the difference. Let’s dive into the steps needed.
Inspect For Imperfections
Start by examining the cabinets closely. Look for drips, streaks, or uneven areas. Use bright lighting to spot any flaws.
- Check corners and edges carefully.
- Feel the surfaces for any rough patches.
- Make notes of areas needing attention.
Touch Up Paint
Next, address any imperfections found. Use a fine brush for small areas. For larger patches, use a small roller.
- Gently sand any rough spots.
- Wipe away dust with a damp cloth.
- Apply a thin coat of paint to the problem areas.
Allow the touch-up paint to dry completely. Inspect the cabinets again to ensure a smooth finish.
Clean Up
Finally, clean your workspace and tools. Proper cleaning extends the life of your brushes and rollers.
| Item | Cleaning Method |
|---|---|
| Brushes | Use warm soapy water, rinse thoroughly. |
| Rollers | Rinse with water, squeeze out excess. |
| Paint Trays | Scrape out leftover paint, wash with water. |
Dispose of any paint responsibly. Wipe down surrounding areas to remove any splatters or dust.
These finishing touches ensure a polished, professional look for your cabinets.
Frequently Asked Questions
How Do I Prepare Cabinets For Painting?
Clean thoroughly, sand lightly, and use a good primer. Ensure surfaces are smooth and dust-free.
What Type Of Paint Is Best?
Use high-quality, durable paints like acrylic or latex. They provide a smooth finish and are easy to clean.
Do I Need To Sand Cabinets?
Yes, lightly sanding helps the primer and paint adhere better. Use fine-grit sandpaper for best results.
Can I Paint Over Stained Cabinets?
Yes, but clean and sand the surface first. Applying a primer is crucial for proper adhesion.
How Many Coats Of Paint Are Needed?
Usually, two coats of paint provide a smooth, even finish. Allow each coat to dry completely.
Should I Remove Cabinet Doors?
Yes, removing doors and hardware ensures an even paint job. It also prevents paint from sticking to hinges.
What Tools Do I Need?
You’ll need brushes, rollers, painter’s tape, sandpaper, and a good primer. Drop cloths protect surrounding areas.
How Long Does The Process Take?
It typically takes a few days. Drying times between coats are crucial for a professional finish.
Can I Use A Paint Sprayer?
Yes, a paint sprayer offers a smooth, even finish. It’s faster but requires careful masking and ventilation.
How Do I Avoid Brush Marks?
Use high-quality brushes and apply thin, even coats. Sand lightly between coats for a smooth finish.
Conclusion
Transforming your kitchen cabinets with a fresh coat of paint is simple and rewarding. Follow the steps carefully for a professional finish. Enjoy your revitalized kitchen space. Remember, patience and attention to detail are key. Happy painting and enjoy your beautiful new cabinets!

